
According to Forbes magazine, office employees receive around 200 messages every day and take 2.5 hours of their day to answer these emails. Incredible, right?
All in all, how much time do we spend writing, sending, reading and answering emails in our days?
Have you noticed that most of those email messages have the same structure?
Taking the time to create even one personal template instead of just sending your regular email message can seem to be overkill, but you will soon realize that if you do it for every type of email you send more than once, the return on investment is pretty interesting.
Aware of your reality, Microsoft CRM has integrated a tool that allows you to create email templates in your Microsoft Dynamics CRM to help reduce time lost creating those emails.
In this article, I will show you how to create an email template in your Dynamics 365.
Before Setting up Your Email Template in Dynamics 365, You Have To...
Identify the Type of Email That You Write Most Often
Simply look at the last 50 emails you have sent and compile their subjects.
This way, you will target all the type of email that would have the most value as your first email template.
Where To Find and How To Use the Email Template Editor in Dynamics 365?
Make Sure You Have the Necessary Security Level To Create a Template
If you don't see what I'm showing you, make sure to warn the administrators of your Dynamics 365 so they can give you the essential securities to create a template.
- Click on the Parameters tile and select email templates

- Select Email templates

- From the Actions toolbar, select New

There is a well-stocked list of system templates that Microsoft has created for your organization.
You can use them as is or as a starting point to inspire your own.

WARNING
Do not modify these templates since they might be linked to automated emails for your business.
If you modify these system templates, the integrated email message in your automatization will also change.
I suggest that you do a copy and paste of the templates you are interested in modifying in Microsoft Word. That way, the templates already in place won't be affected and you will be able to create new templates by clicking on the New button, as shown in the image above.
- Once you have clicked on the New button, a box Type of email templates will appear on the screen. In the list Type of email template, select the option that best defines the role of your template and click OK.
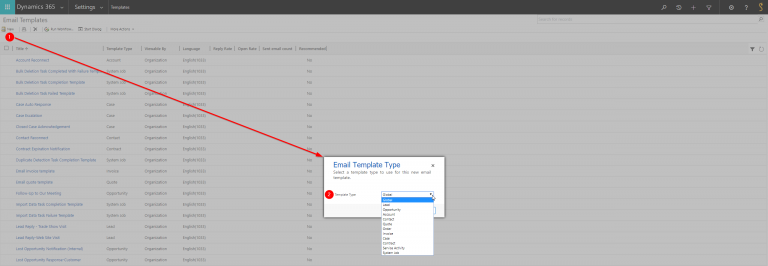
IMPORTANT
If you choose a specific type of record, like a prospect or opportunity, the template will be available only for that type of record.
To use the same content for another type of record, you must create a new template.
- Once you have chosen your template type, Dynamics 365 will open the editor of the email Enter a title, a subject and a description that explains the goal of this template. The description can only be viewed by you and the CRM users, it won't be shown to your recipient.

- Write your email. You will recognize the interface, which is practically identical to the one we can see in any text editor.
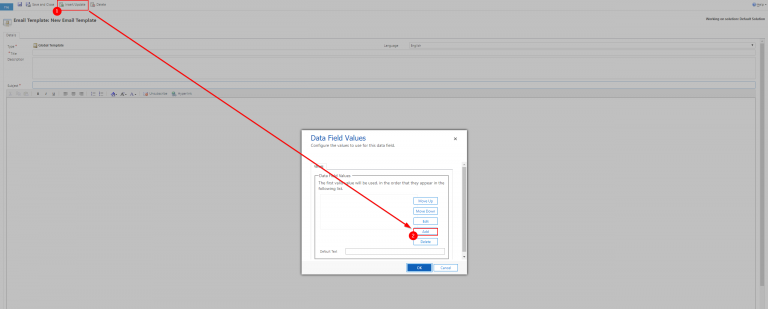
- You are now at the step to add data fields in your email. This option is really powerful because it allows you to customize each email that you are sending from your template, like the name of the client or quote data in a Dynamics 365 record. Select the button Add/Update and the box Data Field Value, select Add.
- In the box Add Data Value, select Type of Record, and the Field, then select Ok and for a second time Ok to return to your email editor.
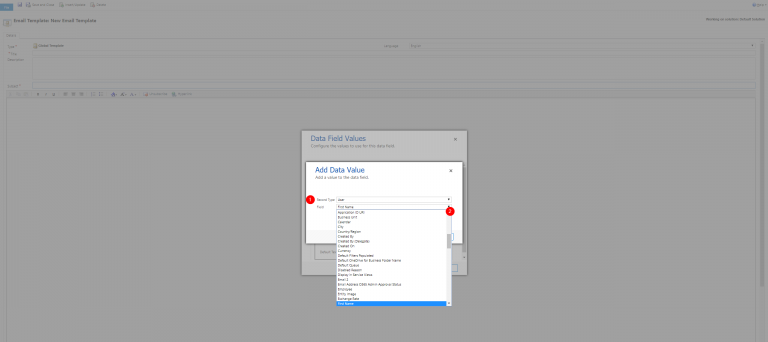
Don't hesitate to use the Text zone by default to define the email body that will be displayed if the record doesn't have any data for the designated field.
- Select Save, if you want to continue working on your template, or Save and Close if you are done.

You may notice that the words in the yellow box represent where Dynamics 365 will associate the field value in your email template.
- It's easy to add an attached file in your template. Go to the bottom of the email template editor and you will find a section that will allow you to create an attached file simply by clicking on the button Create an Attached File.
Quick Tip for Your Email Templates in Dynamics 365 CRM
You cannot add images or HTML code directly into the emails or the email templates, but you can use the copy function to copy an image from a website and paste it into your email or template.
The image will be available as long the website is online. The recipient will be able to see it at the reception of the email, if you have added the link of the image to your template.
To include a hyperlink in your email template, type the URL, including the prefix HTTP://. Don't include the comma, period or space after the URL to preserve the integrity of the link.
Select the text of the link and click on Make this element a hyperlink.
We have shown you how to simply create an email template in Dynamics 365 CRM. This is only the beginning. In this next blog, we teach you how to integrate this template in automation of Dynamics 365 (your workflow).

Liked what you just read? Sharing is caring.

January 04, 2019 by Frédéric Charest by Frédéric Charest VP of Marketing
Data-driven Growth Marketer with a Passion for SEO - Driving Results through Analytics and Optimization

