
Forms in Dynamics 365 play a crucial role in capturing essential information, improving customer engagement, and streamlining business processes. Whether you're collecting leads or customer feedback, forms help you create a structured experience for your users.
In this blog, we’ll walk you through how to create a form in Dynamics 365, offering key insights and best practices to enhance your form-building journey.
Why forms matter in Dynamics 365?
Forms are used to gather data in a structured way that can be processed efficiently. They provide a user-friendly way to interact with customers and employees, collect relevant information, and drive insights within Dynamics 365.
Whether it’s for marketing, customer service, or sales, forms can be the difference between manual data entry and an automated, streamlined process. There are various types of forms that you can create in Dynamics 365, each with their own purpose and objectives.
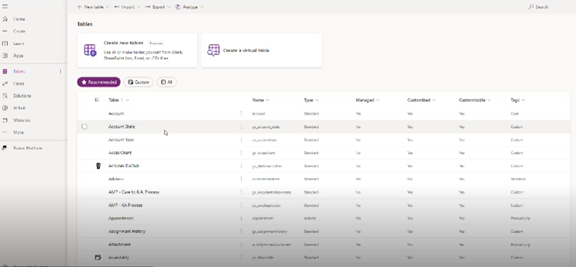
Step 1: Accessing Power Apps
- Log in to your Power Apps portal.
- Navigate to "Tables".

- Select the specific section where you want to edit or create the form in the CRM. For the purpose of this blog, we decided to modify a form in Account.

Step 2: Selecting the type of form
Dynamics 365 offers various types of forms depending on your specific business needs. You need to select the type of form that is aligned based on your business goals.
It is always recommended to select an existing form to edit as it takes less time. It is also advisable to save the original version of the form so as you have access to the information before any edits were made.

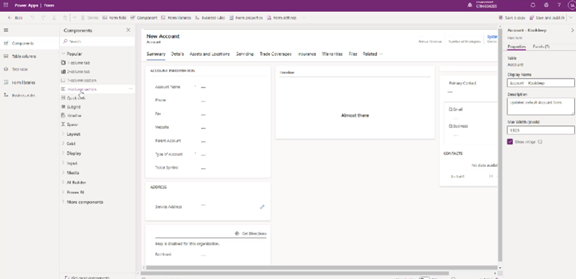
Step 3: Designing your form
This is where the fun begins! Dynamics 365 offers a drag-and-drop interface to design your form. Key design elements include:
- Fields: Add fields that capture the data you need. You can include text boxes, dropdowns, radio buttons, and more. For example, a lead form may need fields like “First Name,” “Email,” and “Phone Number.”
- Sections: Group related fields together for a cleaner look. For instance, you can have a “Contact Information” section with fields for name, phone, and email.
- Tabs: If your form needs to cover multiple aspects, like customer information and service requests, use tabs to organize data efficiently.
Step 4: Configuring the form settings
After adding the design elements, configure the form settings:
- Field validations: Ensure the accuracy of data by configuring required fields, setting data formats (e.g., email, phone number), and applying field-level validations.
- Visibility rules: You can control which sections or fields appear based on user input, making forms more dynamic and user-friendly.
- Data mapping: If your form is linked to other processes (e.g., sales, customer service), ensure the fields are mapped correctly to flow into the right sections of Dynamics 365.
The most important part is to properly name your form so that it is easily identifiable by everyone.
Step 5: Integrating the form with your business process
Forms in Dynamics 365 aren’t just about data collection; they integrate deeply with other workflows. Here’s how you can leverage your form:
- Connect to marketing campaigns: If you are creating a form for lead generation, you can integrate it with marketing campaigns to automatically capture and nurture leads.
- Customer service workflows: Support forms can be connected to case management processes, ensuring that service requests are properly routed and handled.
- Analytics and insights: Use data from forms to gain insights on customer behavior, preferences, and needs, which can fuel your CRM efforts.
Step 6: Testing your form
Before deploying your form, it’s important to test it. Here’s how:
- Preview mode: Dynamics 365 offers a preview mode, so you can see how your form looks and behaves before going live.
- User testing: Share the form with a small group of internal users to ensure the experience is seamless. Check for any issues with layout, functionality, or validation rules.

Step 7: Publishing the form
Once satisfied with your design and testing, it’s time to publish the form:
- Click on “Save & Close” to save your work.
- Hit “Publish” to make the form live and accessible to users.
- The last step consists of choosing on which app you want to publish your form. You can do so by clicking on “Apps” on the left menu bar, and then choosing the applications.

Step 8: Tracking and Reporting
One of the most significant advantages of using forms in Dynamics 365 is the ability to track responses and generate reports:
- Form submission reports: Monitor the performance of your forms, including how many submissions you’ve received and from where.
- Lead nurturing: If using lead generation forms, Dynamics 365 can help you automatically nurture these leads through tailored marketing journeys.
- Customer service analytics: In case management, you can track response times, ticket resolution efficiency, and more, all from the data collected via forms.
Best practices for creating forms in Dynamics 365
Keep it simple: Only ask for the essential information. The shorter and more straightforward your form is, the higher your submission rates.
- Use conditional logic: Make your forms dynamic by showing or hiding fields based on user input. For example, only show the "Company Size" field if the user selects "Business" as their role.
- Brand your forms: Make sure your forms align with your brand’s identity, using consistent fonts, colours, and logos.
- Optimize for mobile: Many users will access your forms on mobile devices, so ensure the form is responsive and easy to fill out on a smaller screen.
Creating a form in Dynamics 365 is a straightforward yet powerful way to capture, organize, and act on data within your organization. By following this step-by-step guide, you’ll be able to create a form that not only serves your business needs but also enhances the customer experience.
Whether it’s lead generation, customer support, or gathering feedback, forms in Dynamics 365 are an invaluable tool for any business looking to streamline operations and improve data-driven decision-making.
If you're ready to create a form in Dynamics 365, consider all the elements mentioned above to ensure you're setting up forms that not only collect data but also drive customer engagement through Customer Insights Journeys. Get in touch with us at Gestisoft as well for more guidance on how to create and edit forms in Dynamics 365.
Liked what you just read? Sharing is caring.

October 27, 2025 by Kooldeep Sahye by Kooldeep Sahye Marketing Specialist
Fuelled by a passion for everything that has to do with search engine optimization, keywords and optimization of content. And an avid copywriter who thrives on storytelling and impactful content.

