

Understanding the Importance of System Views in Dynamics 365
Microsoft Dynamics 365 is a powerful customer relationship management (CRM) and enterprise resource planning (ERP) software suite that empowers organizations to manage their customer data, streamline business processes, and make data-driven decisions. One of the core features that facilitate this functionality is the concept of System Views.
System Views are a fundamental aspect of Dynamics 365 as they provide a structured and organized way to view and interact with data stored within the system. These views offer a tailored perspective of your data, allowing users to access and analyze information that is relevant to their roles and responsibilities.
In this comprehensive guide, we will delve deep into the world of System Views within Microsoft Dynamics 365. Whether you're an administrator looking to create custom views to meet specific business needs or an end-user seeking to understand how to navigate and utilize these views effectively, this article will provide you with the knowledge and tools you need.
What You Can Expect in This Article
Throughout this article, we will explore the following key aspects of System Views:
- Getting Started with Dynamics 365: We'll begin by setting up your Dynamics 365 environment and guiding you on how to access the customization area where System Views are created and managed.
- System Views: An Overview: Gain a solid understanding of what System Views are, the different types available, and their practical applications in the Dynamics 365 ecosystem.
- Identifying Your Business Needs: Before creating System Views, it's crucial to assess your organizational requirements and define the specific purposes your views will serve.
- Navigating to the View Designer: Learn how to access the View Designer interface within Dynamics 365 and understand its layout and components.
- Creating a New System View: We'll provide a step-by-step guide on building your first System View, from selecting the relevant entity to configuring filters and naming your view.
By the end of this article, you'll have the knowledge and confidence to create, customize, and effectively utilize System Views in Microsoft Dynamics 365, helping you and your organization harness the full potential of this versatile CRM and ERP solution.
Let's embark on this journey to unlock the power of System Views in Dynamics 365!
Master Tip: Start with a Personal View
When diving into the world of System Views in Microsoft Dynamics 365, my number one tip is to begin by creating a personal view. Why? Personal views are an invaluable tool for honing your view-building skills and understanding the intricacies of filters and data durations.
Personal views are perfect for short-term use: They allow you to experiment, fine-tune, and iterate on your view's design without affecting others' access to the data. Whether you're testing different filter criteria or exploring the best way to present information, personal views provide a safe playground for your creativity.
By crafting personal views, you gain a deeper understanding of how to extract the specific data you need and set the right time frames for your views. This hands-on experience is invaluable in preparing you for the creation of more complex System Views.
System views should be used for long-term use and shareability: Once you've fine-tuned your view in a personal context, you can transition to creating System Views. These are designed for long-term use and are easily shareable with your team or across your organization. They reflect your refined understanding of data presentation and are tailored to meet your organization's ongoing needs.
So, remember to start with a personal view as your testing ground. It's your gateway to mastering the art of view creation in Dynamics 365 (and you can use fetch xml to quickly generate your system views for the pros).
Creating and Customizing Views in Microsoft PowerApps for Dynamics 365
The ability to access and present information in a way that suits your organization's unique needs is paramount. Microsoft PowerApps, in tandem with Dynamics 365, offers a powerful solution for this task, allowing you to create and customize views effortlessly. In this guide, we'll take you through the steps to craft tailored views that align with your business objectives, enhancing your data management and decision-making capabilities.
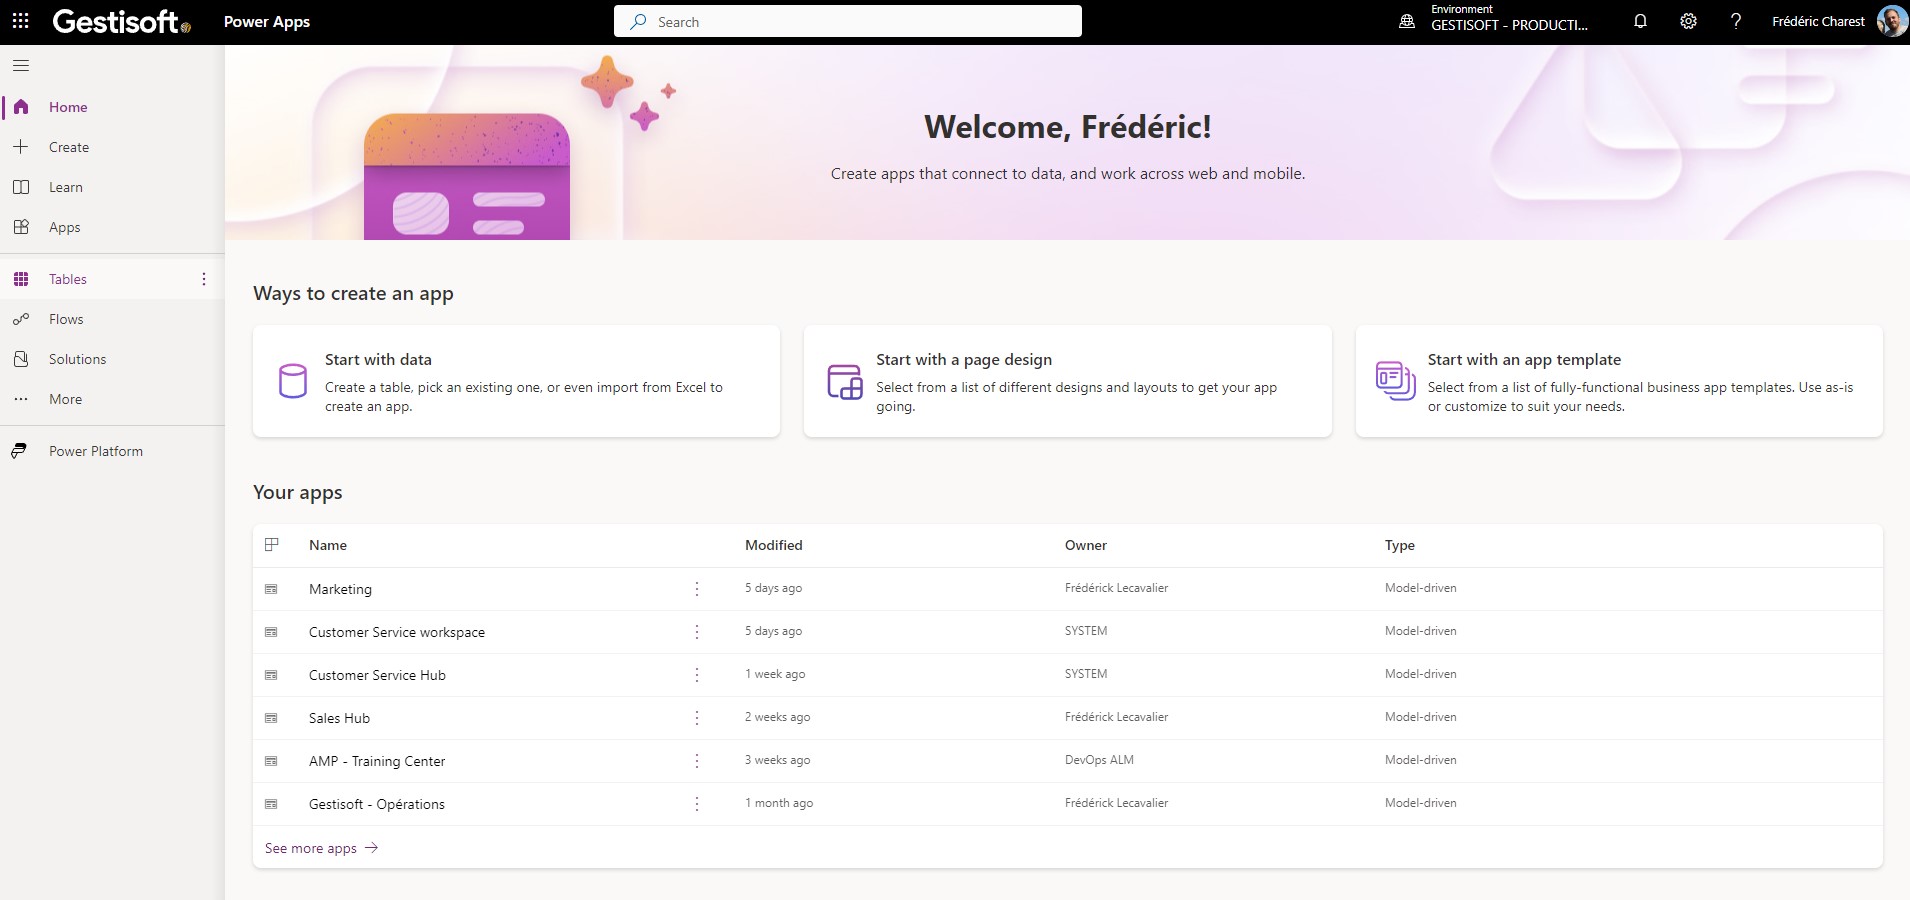
Step 1: Login to make.powerapps.com
To get started with creating a view in Microsoft PowerApps for a Dynamics 365 table, you'll need to log in to the PowerApps portal at make.powerapps.com. Make sure you have the necessary permissions and access to the relevant Dynamics 365 environment.
Step 2: Click on Table and Select the Table
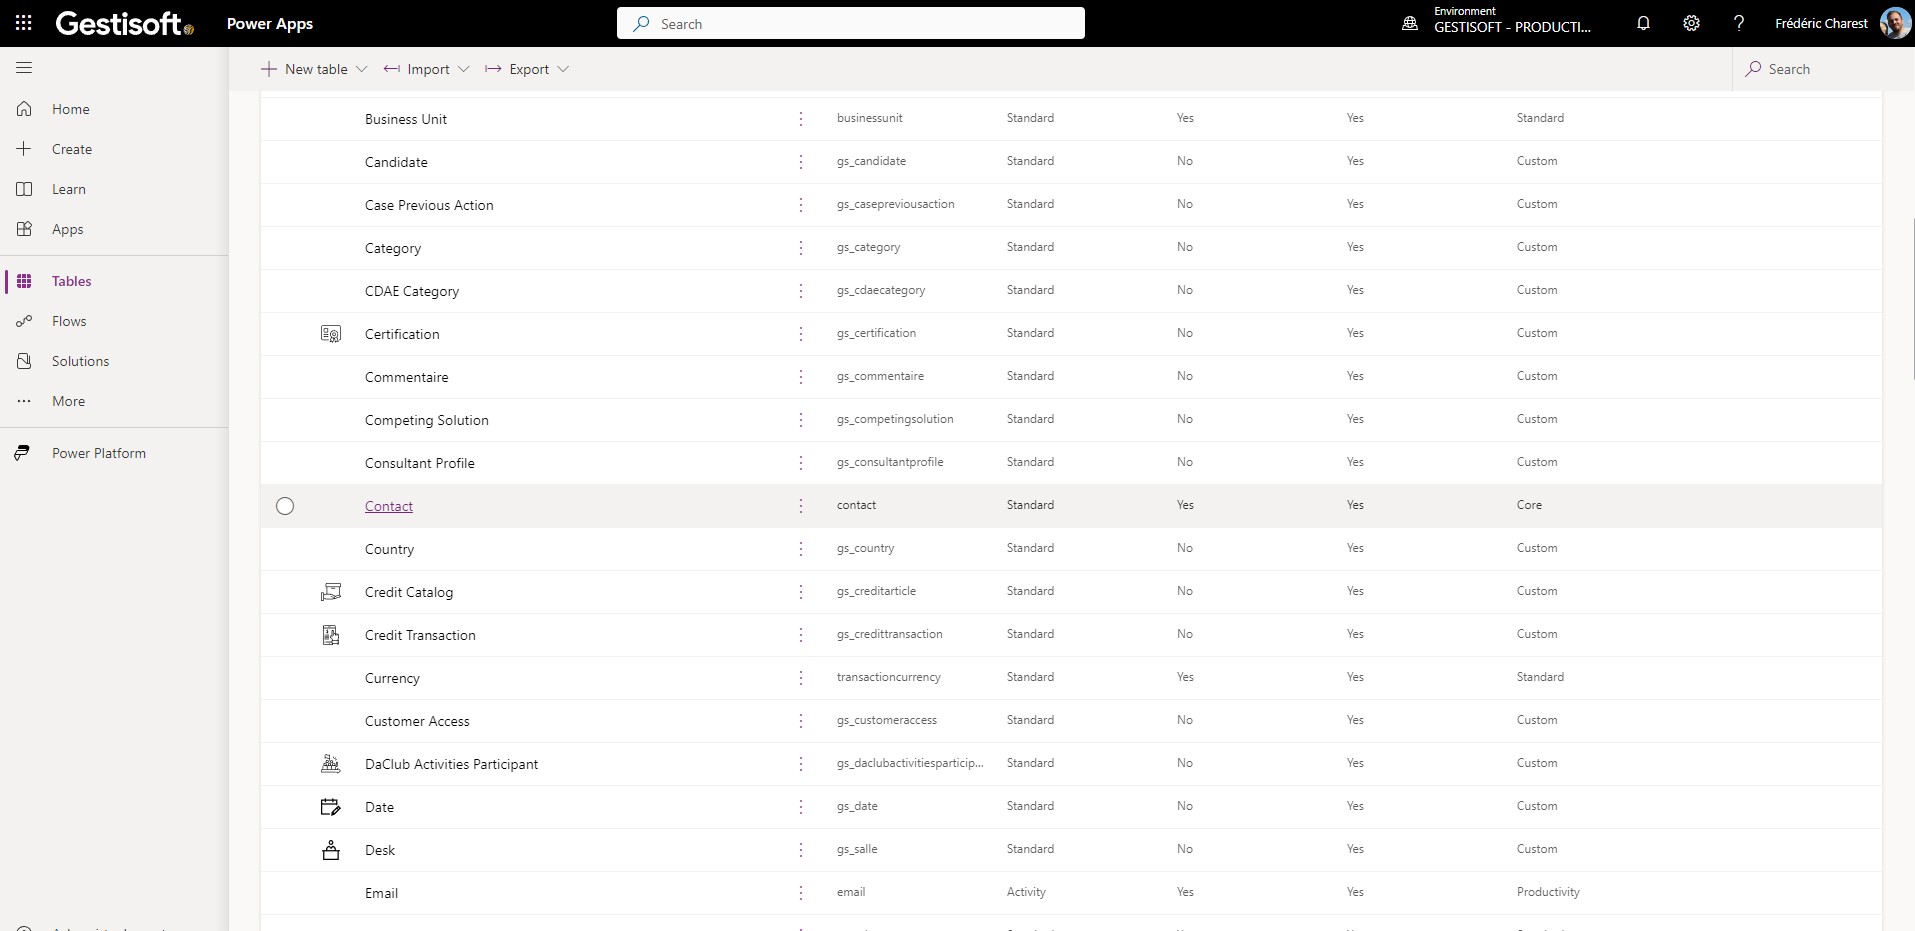
- Once you're logged in, navigate to the left-hand menu and click on "Table." This is where you'll find a list of tables associated with your Dynamics 365 environment.
- Choose the specific table for which you want to create a view. This could be Accounts, Leads, Opportunities, Cases, Contacts, or any other entity that you're working with.
Step 3: Select the Data Experience - Views
- After selecting the table, you'll see various data experiences you can work with. Choose "Views" to work on creating or editing views for this table.
- At this point, you have two options:
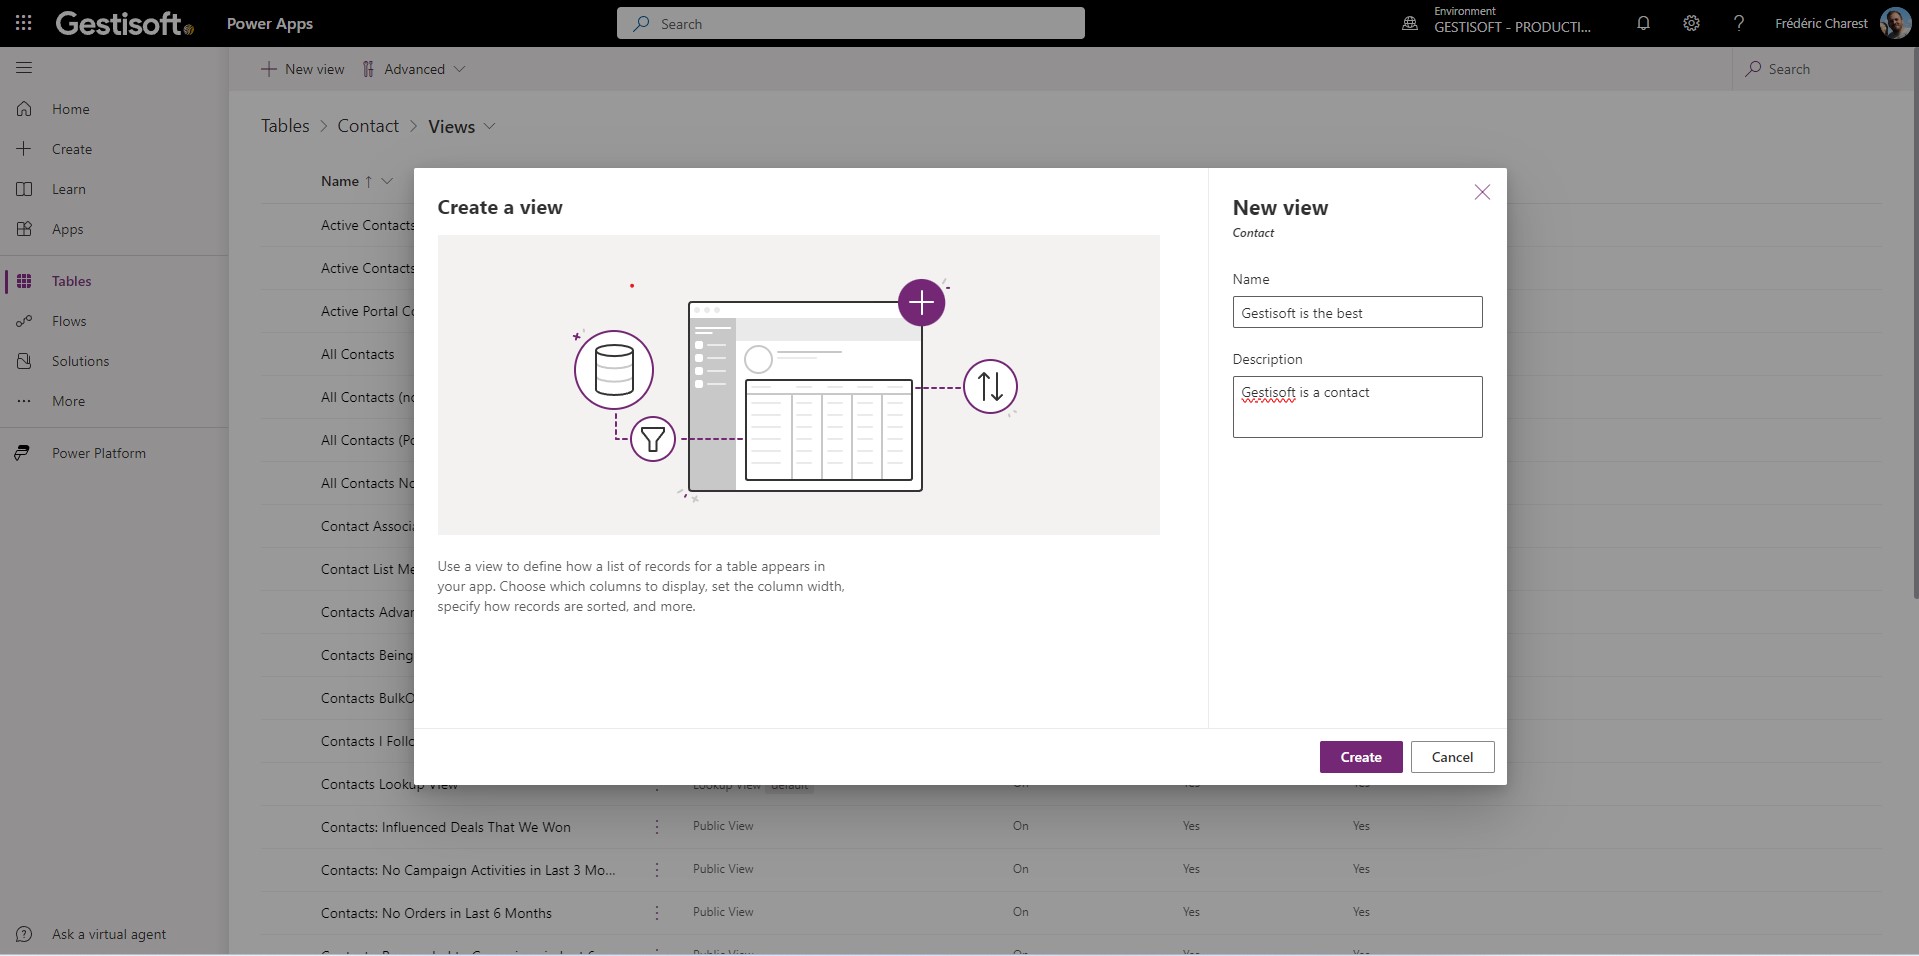
a. Create a New View from Scratch: This option allows you to build a view entirely from the ground up, defining filters, columns, and sorting options as per your requirements.
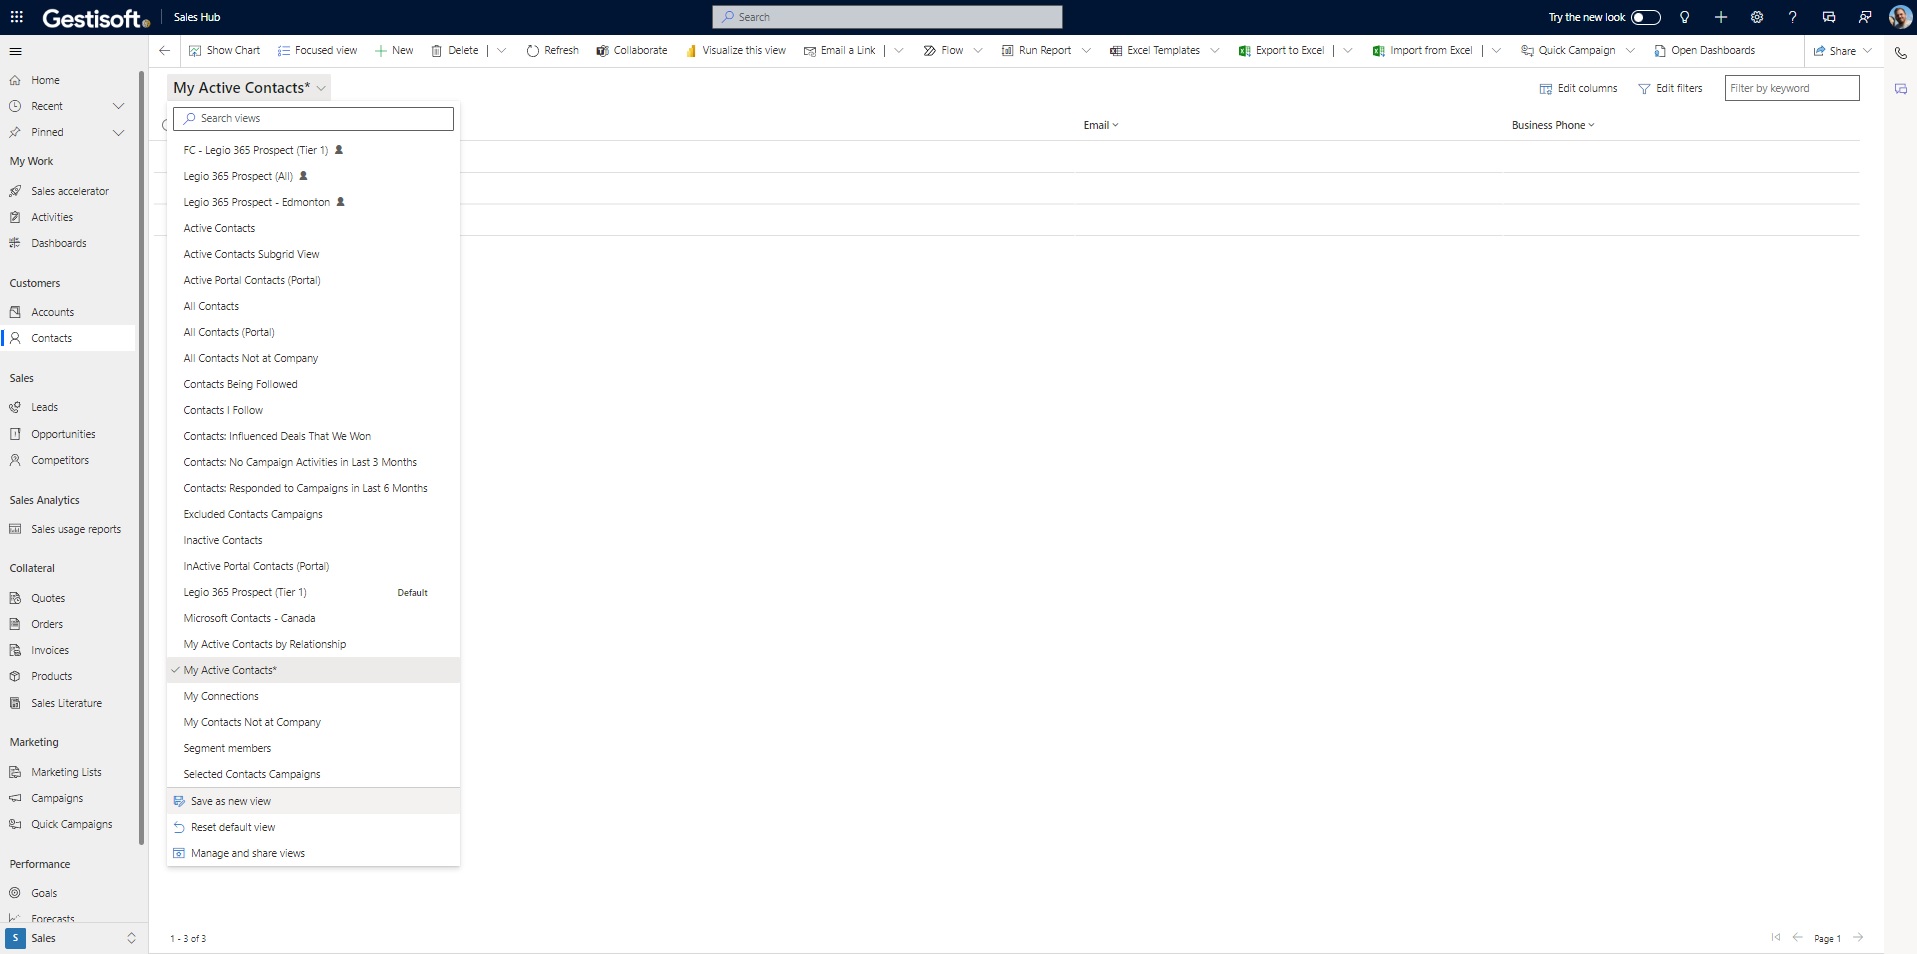
b. Create a View from an Existing One (Save As): If you want to start with an existing public view as a template, you can select this option. It allows you to make modifications to the selected view and save it with a new name.
Step 4a: Editing an Existing View (Save As)
If you chose the "Save As" option to edit an existing view, follow these steps:
- Select the view you want to modify from the list of existing views.
- You can now easily edit the existing filters and columns. Customize the view to display the specific data you want in your application.
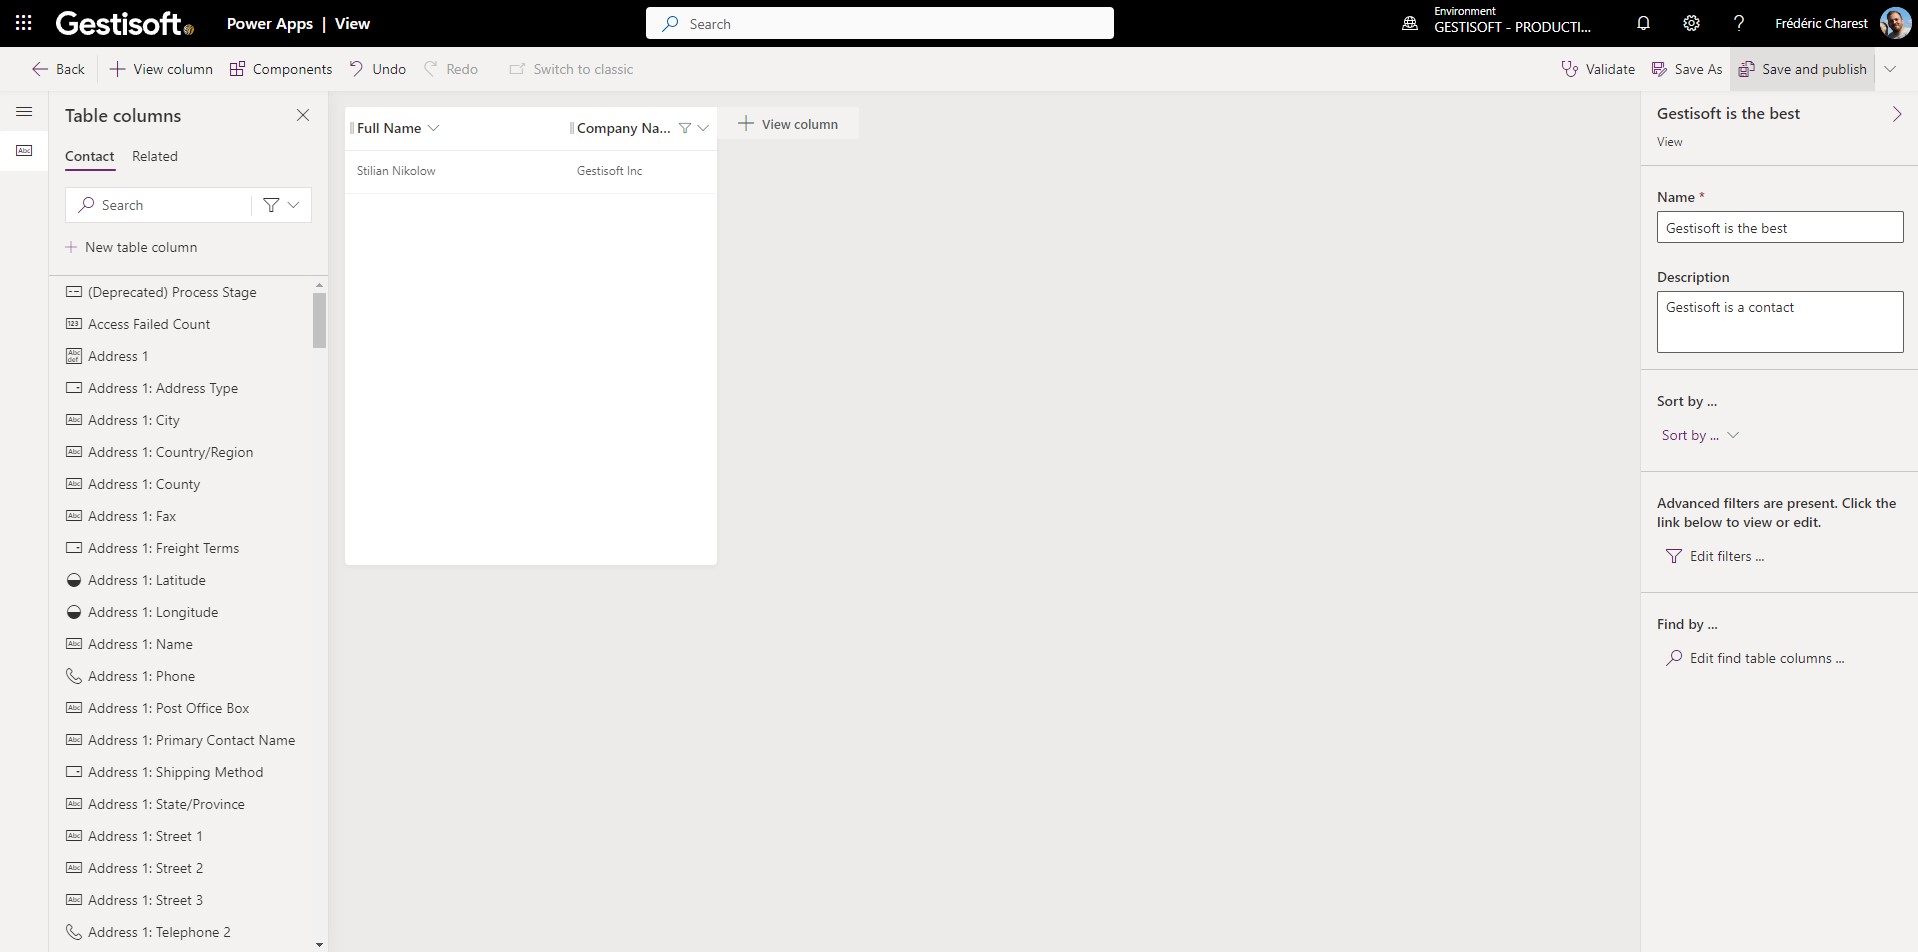
Step 4b: Creating a New View from Scratch
If you opted to create a new view from scratch, you'll need to define the view components:
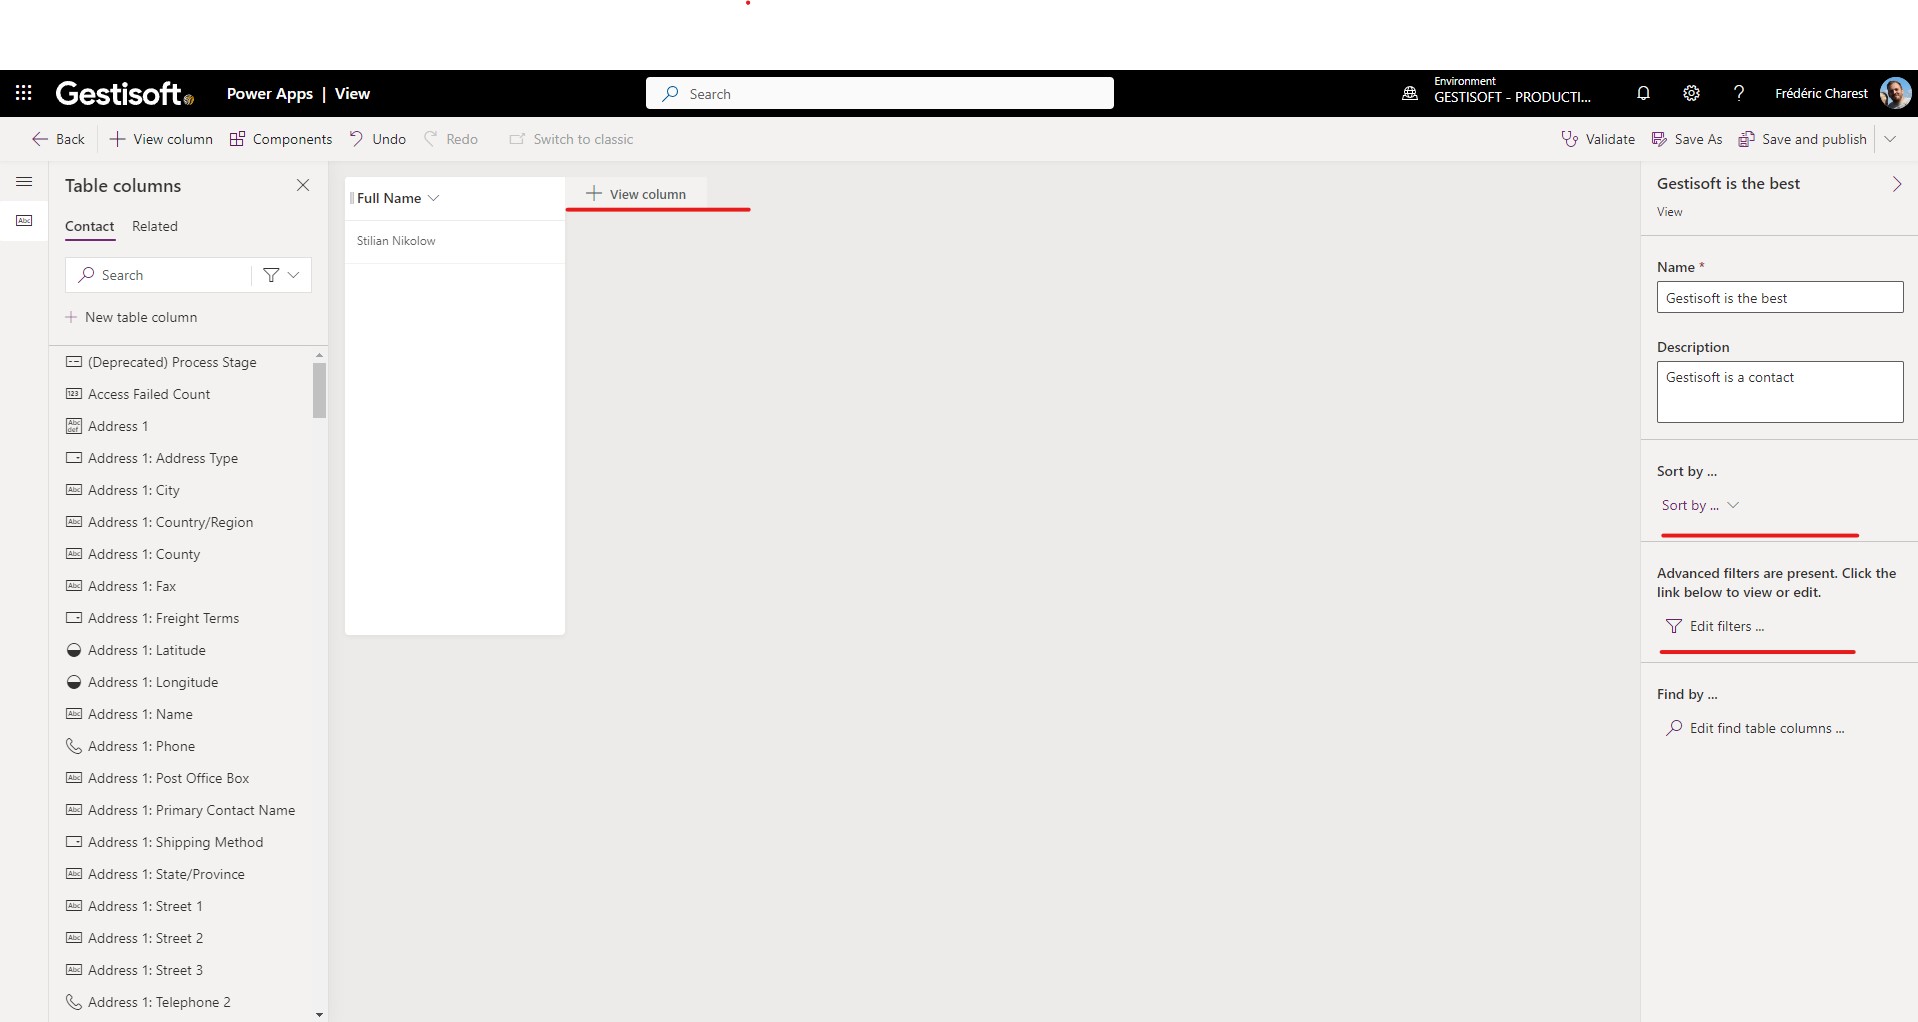
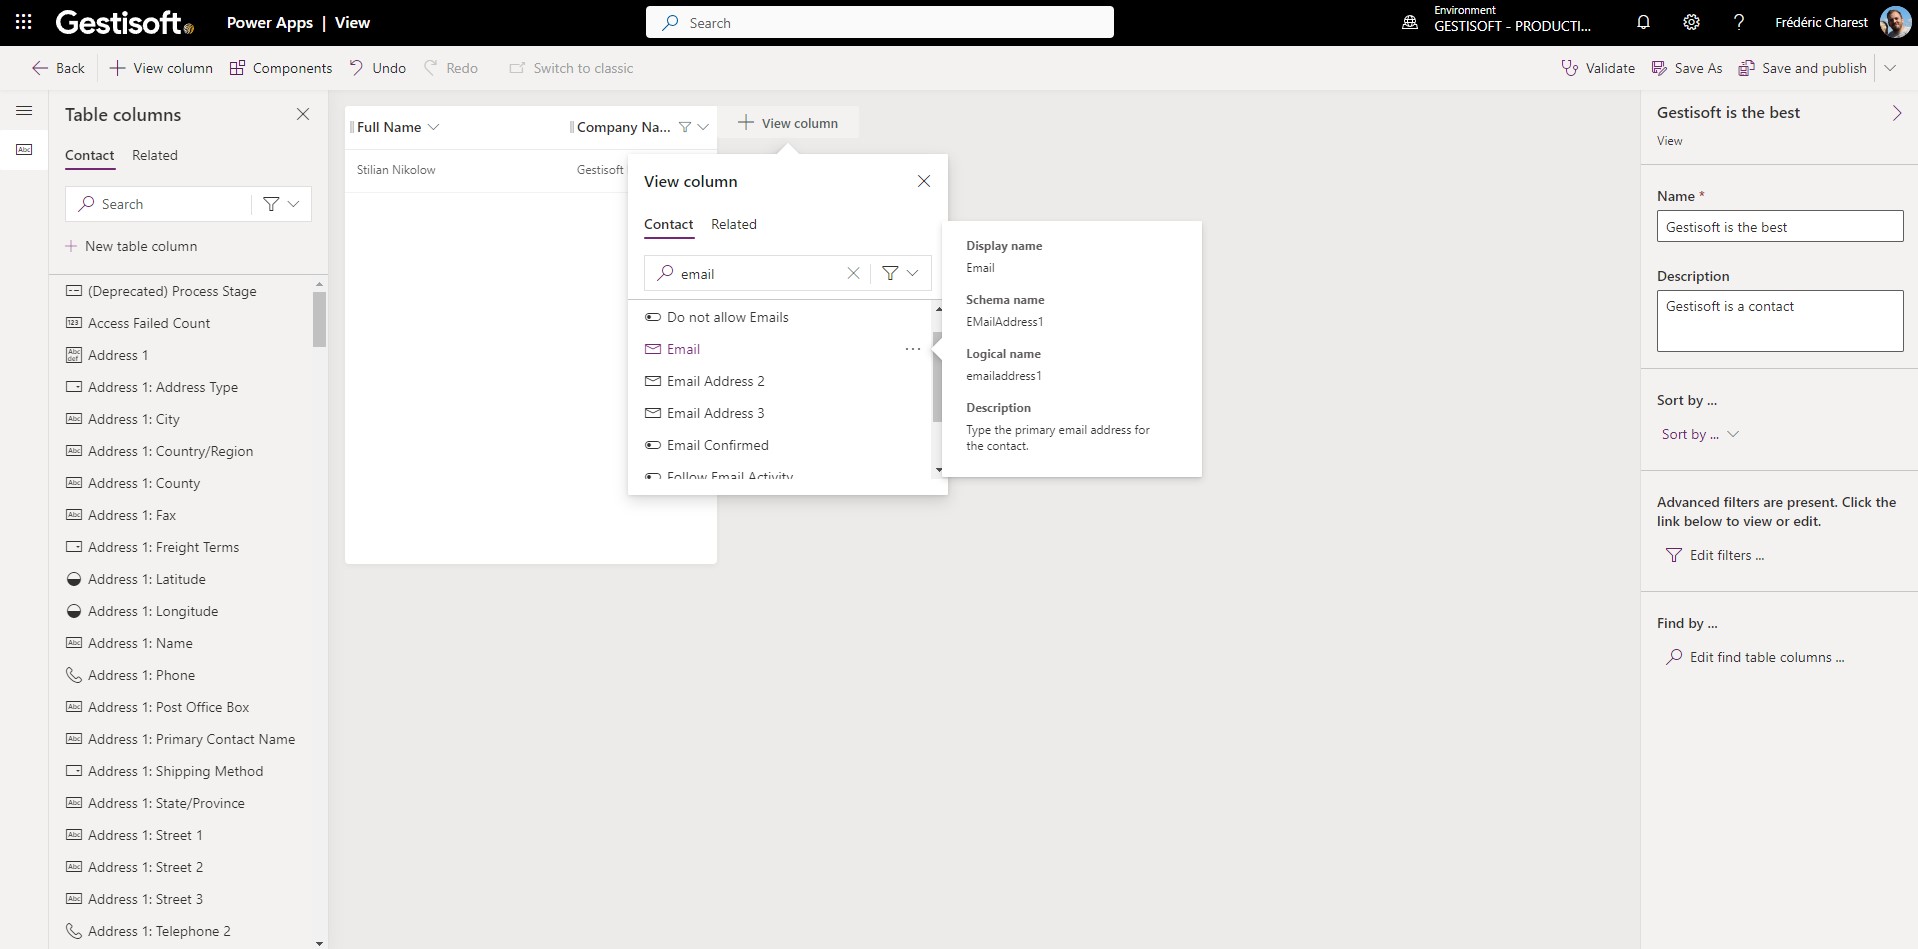
- Columns: Determine which information you want to display on the screen. Select the columns that are relevant to your view. These columns represent the data fields you want to show.
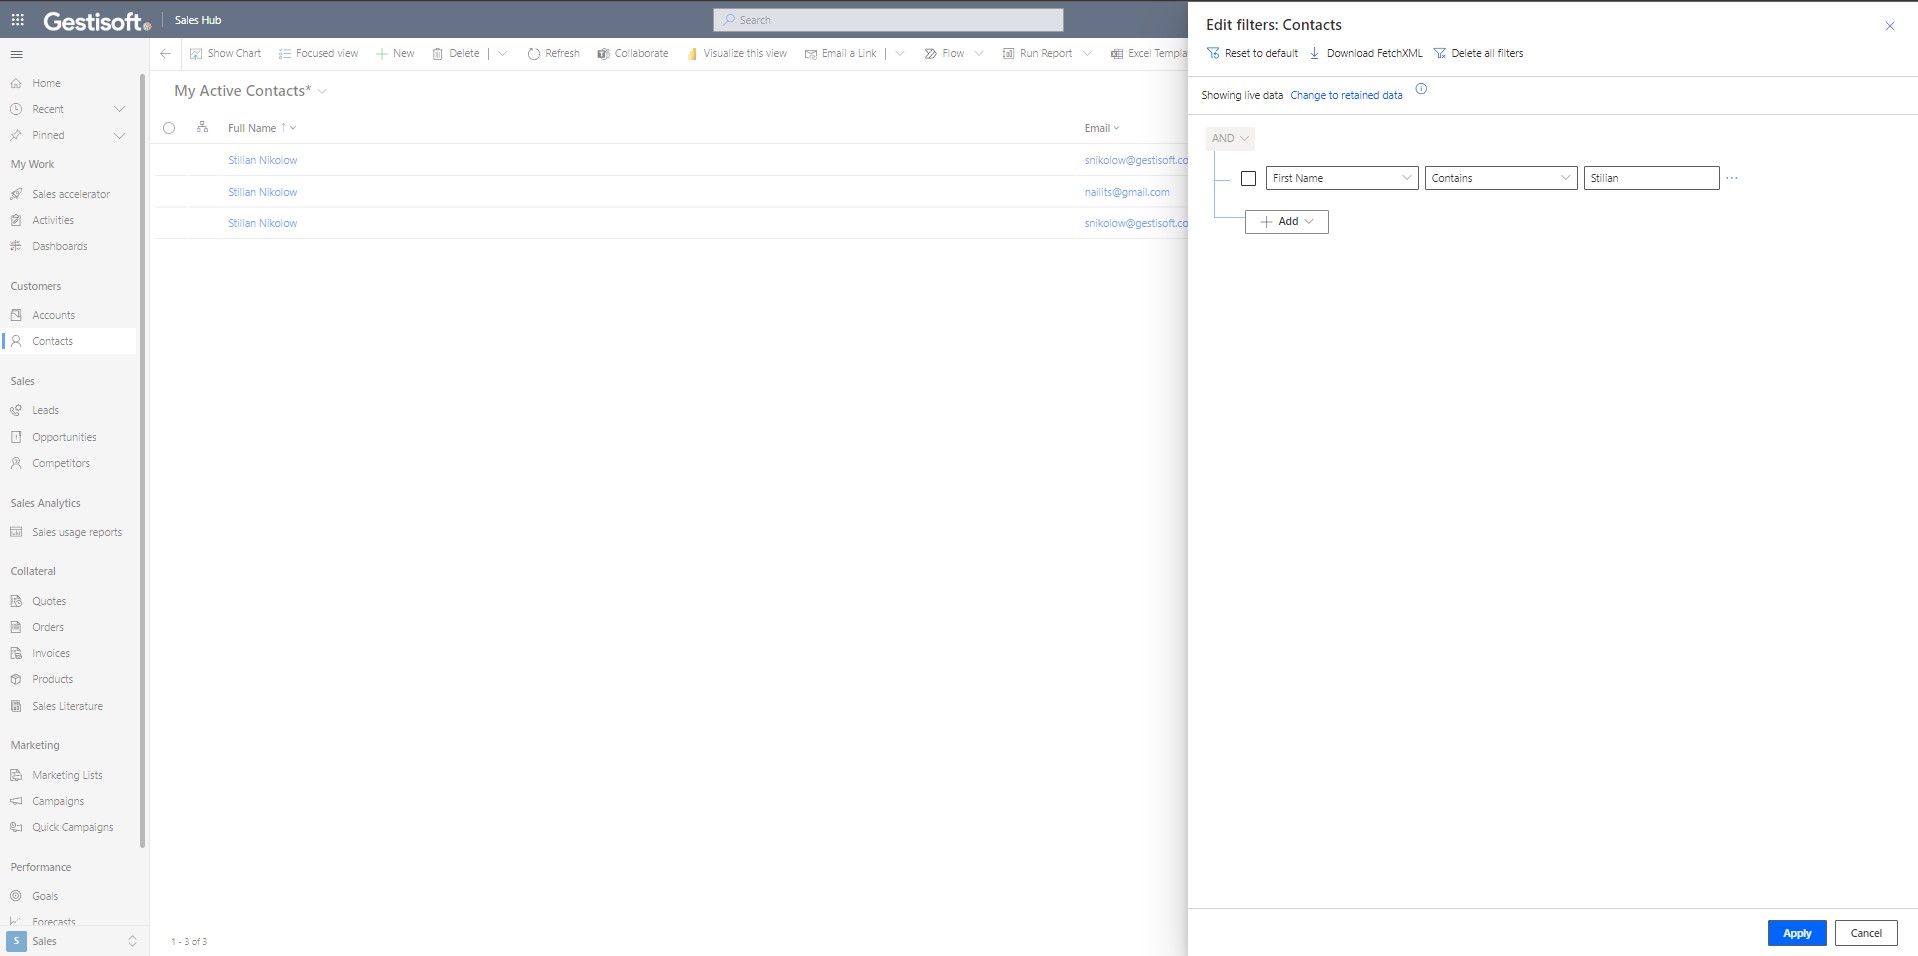
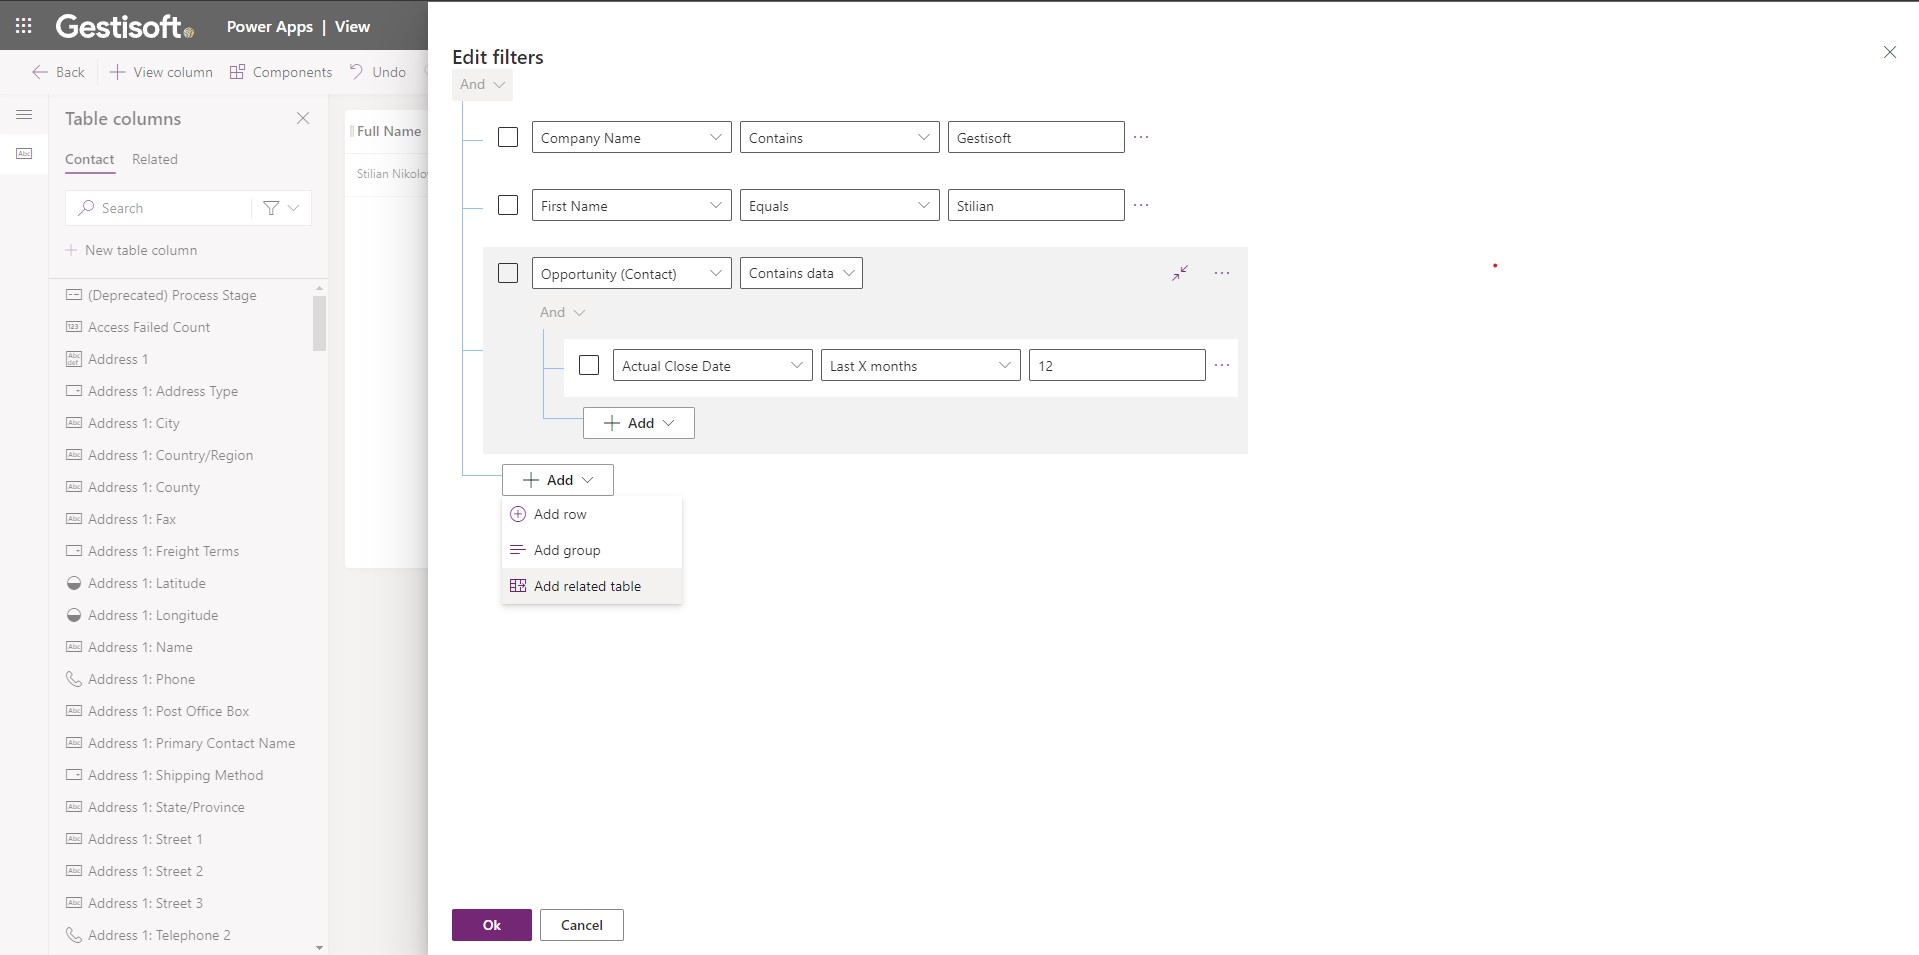
- Filters: Define the criteria by which you want to filter the data. This allows you to identify specific records that meet certain conditions.
- Sorter: Specify the order in which you want the information to be displayed. You can sort data by a particular column in ascending or descending order.
Step 5 (Optional): Adding the View to an App
If your PowerApp is customized and you want to include this view within a specific app, follow these steps:
- Navigate to the "App" section in the left menu.
- Select the appropriate app where you want to add the view. For example, you might choose "Sales Hub" if it's related to sales activities.
- Within the app settings, you can add the newly created or modified view to the app, making it accessible to users of that app.
If you need more information about System Views, keep reading!
Accessing the Customization Area
Once you're in the customization area, you'll have access to various tools and features for configuring and customizing your Dynamics 365 instance. The customization area is where you'll spend a significant portion of your time when working with System Views.
Here's a brief overview of what you can expect to find in the customization area:
- Entities (Tables): This is where you manage the various entities that represent different types of records in your Dynamics 365 environment. Entities could include leads, contacts, accounts, opportunities, and more.
- Fields (Columns): Fields are the data elements within entities. You can define and customize fields to store specific information relevant to your business processes.
- Views: Views are what we'll be focusing on in this guide. They allow you to define how records are displayed and filtered within Dynamics 365.
- Forms: Forms control the layout and user interface for entering and editing records.
- Workflows and Processes: These tools automate various actions and tasks based on predefined rules and conditions.
- Solutions: Solutions are containers for packaging and transporting customizations between environments. They help maintain consistency and integrity when working with Dynamics 365.
In the next section, we'll explore System Views in more detail, so you can better understand their significance in organizing and presenting data effectively within your CRM system.
Microsoft Dynamics 365 System Views: An Overview
What Are System Views?
System Views, at their core, are predefined ways to present and filter data within Microsoft Dynamics 365. These views provide users with a structured and organized means of accessing and analyzing data, making it easier to find and work with information relevant to their roles and responsibilities.
In Dynamics 365, you'll encounter several types of views, each serving distinct purposes. Here are some of the common types you may come across:
- System Views: These are built-in views provided by Dynamics 365. They are designed to cover common scenarios and often serve as starting points for creating custom views. System views are typically accessible to all users with the appropriate permissions.
- Personal Views: Users can create their own personalized views to filter and sort data based on their specific needs. Personal views are private and visible only to the user who created them.
- Custom Views: Administrators and customizers can design custom views tailored to specific business requirements. These views can be made available to selected users or teams, ensuring that the right people have access to the right data.
- Lookup Views: These views are used when selecting records from a lookup field, such as associating a contact with an account. Lookup views help users quickly find and select the appropriate record.
- Associated Views: Associated views display records related to the current record, such as displaying all contacts associated with an account. These views make it easy to navigate related data.
Different Types of System Views
While System Views are a critical component of Dynamics 365, it's important to understand the various types of system views you might encounter:
- Public System Views: These are available to all users with the appropriate permissions. Public system views are often used to provide a consistent data presentation across the organization.
- Private System Views: These views are designed for specific users or teams and are not visible to others. Private system views are useful when different teams or departments need tailored views for their tasks.
- Default System Views: Default system views are provided by Dynamics 365 out-of-the-box. They cover standard scenarios and can be customized to meet your organization's unique needs.
- Custom System Views: Administrators can create custom system views to accommodate specific business processes or reporting requirements. Custom system views offer a high degree of flexibility.
Use Cases for System Views
System Views play a pivotal role in streamlining processes and improving user productivity within Dynamics 365. Here are some common use cases:
- Sales Pipeline Management: Views can be created to display opportunities at different stages of the sales pipeline, helping sales teams prioritize and track deals.
- Customer Service: Service agents can use views to quickly access and resolve customer cases, categorizing them by priority, status, or other criteria.
- Marketing Campaigns: Marketers can create views to segment leads and contacts for targeted marketing campaigns, ensuring messages reach the right audience.
- Data Reporting: Views can be customized to retrieve and present specific data for reporting and analysis, providing valuable insights for decision-making.
In the upcoming sections, we will explore the process of creating and customizing System Views, allowing you to harness their full potential in Dynamics 365.
Identifying Your Business Needs for Views in DYnamics 365
Assessing Your Organizational Requirements
Before you dive into creating custom System Views in Microsoft Dynamics 365, it's crucial to take the time to assess your organization's unique requirements. A well-defined understanding of your business needs will guide you in designing views that truly enhance productivity and decision-making. Here's how to get started:
- Engage Stakeholders: Collaborate with key stakeholders within your organization. This may include department heads, team leads, or end-users who rely on Dynamics 365 data. Discuss their pain points, challenges, and specific data presentation needs.
- Identify Use Cases: Document various use cases where customized views can make a difference. For example, in a sales department, use cases might include lead management, opportunity tracking, or sales pipeline analysis.
- Data Prioritization: Determine which data elements are critical for each use case. Understand which fields, records, and criteria are essential for efficient work processes.
- User Roles: Consider the different roles and responsibilities of your Dynamics 365 users. Each role may require distinct views tailored to their tasks. For instance, views for sales representatives will differ from those for customer support agents.
- Data Security: Be mindful of data security and privacy concerns. Ensure that views provide access only to data that users are authorized to see. Dynamics 365 offers role-based security features to control data access.
- Reporting Needs: Consider reporting and analytics requirements. Views can serve as a source of data for generating reports and visualizations. Ensure that the data you present aligns with reporting needs.
Defining the Purpose of Your System View
Once you've assessed your organizational requirements and use cases, it's time to define the purpose of the System View you intend to create. The purpose should be clear and specific, guiding the design and configuration of your view. Here are some examples of common purposes:
- Lead Management View: To provide sales representatives with a clear view of incoming leads, their status, and priority, enabling quick follow-ups.
- Service Ticket Queue: To create a view for customer support agents that displays open service tickets, categorized by urgency and customer satisfaction level.
- Inventory Tracking: To help warehouse managers keep tabs on product inventory levels, highlighting items that are running low or nearing expiration.
- Customer Engagement Dashboard: To build a dashboard-like view that combines critical customer information, recent interactions, and upcoming activities for account managers.
- Pipeline Analysis: To create a dynamic view for sales managers, allowing them to track opportunities at different stages of the sales pipeline and forecast revenue.
Defining a clear purpose ensures that your System View aligns with specific objectives and contributes to improved efficiency and decision-making within your organization.
In the next section, we'll guide you through the process of navigating to the View Designer in Microsoft Dynamics 365, where you can start creating your custom System View based on the identified business needs.
By following these steps, you can efficiently create and customize views for your Dynamics 365 tables within Microsoft PowerApps, tailoring the data presentation to your organization's specific needs and enhancing user productivity.
Please note that the steps provided may vary slightly depending on the PowerApps and Dynamics 365 versions you are using, but the general process remains consistent.
Security and Permissions
In the world of Microsoft Dynamics 365, security and permissions are paramount. While creating and customizing System Views, it's crucial to ensure that the right users have access to the right views, and sensitive data remains protected. This section will guide you through the intricacies of managing security and permissions for your System Views.
Controlling Access to System Views
- Understanding Security Roles: Before diving into the specifics, it's essential to have a grasp of security roles within Dynamics 365. Security roles define what a user can or cannot do in the system, including which views they can access.
- Configuring View-Level Security: Learn how to control access to individual System Views. You'll explore how to restrict certain views to specific teams or roles while making others available to a broader audience.
Role-Based Security for Views
- Creating Custom Security Roles: Sometimes, the built-in security roles might not align perfectly with your organization's needs. Discover how to create custom security roles tailored to your unique requirements.
- Assigning Security Roles: Once you've defined custom roles, the next step is assigning them to users or teams. We'll walk you through the process of granting view access based on these roles.
Advanced Security Considerations
- Data Sharing and Record-Level Security: In some scenarios, you may need to share specific records or restrict access further, even within the same view. Learn how to implement data sharing and record-level security.
- Auditing and Monitoring: To maintain the integrity of your data and views, auditing and monitoring are critical. Explore how to set up auditing for System Views and access reports to track changes.
By mastering the intricacies of security and permissions within Dynamics 365 System Views, you'll ensure that your data remains protected, accessible to the right individuals, and compliant with your organization's policies and regulations.
Advanced Techniques
In the previous sections, we've covered the fundamentals of creating and customizing System Views in Microsoft Dynamics 365. Now, it's time to delve into advanced techniques that will take your view customization skills to the next level. These techniques provide the flexibility to handle complex scenarios and tailor your views to meet unique business requirements.
Leveraging FetchXML for Complex Queries
Introduction to FetchXML
FetchXML is a powerful query language in Dynamics 365 that allows you to construct complex queries to retrieve data for your views. Learn how to harness the full potential of FetchXML to create views that go beyond basic filtering and sorting.
Custom FetchXML Queries
Discover how to write custom FetchXML queries to retrieve specific data sets, apply aggregates, and perform intricate data manipulations within your System Views.
Implementing JavaScript for Dynamic Views
Adding Client-Side Scripting
JavaScript can be a game-changer when it comes to making your System Views more dynamic. Explore how to add client-side scripting to your views for features like real-time calculations, interactive elements, and conditional formatting.
Event Handling and User Interaction
Learn how to handle user interactions within your views, such as click events, hover actions, and pop-up dialogs, to create a more user-friendly and intuitive experience.
Using Power BI with Dynamics 365 Views
Power BI Integration
Power BI is a robust tool for data visualization and reporting. Understand how to integrate Power BI with your Dynamics 365 views to create interactive dashboards and reports that provide valuable insights.
Embedding Power BI Reports
Explore the process of embedding Power BI reports directly into your System Views, allowing users to access dynamic and up-to-date visualizations without leaving the Dynamics 365 environment.
These advanced techniques open up a world of possibilities for tailoring your System Views to match your organization's unique needs. Whether you're working with complex data structures, demanding user interactions, or require in-depth data analysis, these techniques will empower you to create views that truly stand out and enhance your Dynamics 365 experience.
Best Practices for System View in Dynamics 365
As you embark on the journey of creating and customizing System Views in Microsoft Dynamics 365, it's essential to adhere to best practices. Following these guidelines will not only help you optimize the performance of your views but also ensure they remain effective tools for your organization's data management and decision-making processes.
Optimizing View Performance
- Limiting the Number of Columns : Including too many columns in a view can lead to slower performance. Focus on including only the essential data fields to keep your views responsive.
- Efficient Use of Filters: Design filters that are specific and concise. Avoid overly complex filter criteria, as they can impact view performance.
- Consider Data Volume: Be mindful of the volume of data you're working with. Large datasets may require additional performance considerations, such as indexing and optimization.
Documenting Your System Views
- Naming Conventions: Establish a clear and consistent naming convention for your views. This makes it easier for users to identify and select the right view for their needs.
- Adding Descriptions: Include informative descriptions for your views. A well-written description can provide context and guidance to users.
- Version Control: Consider implementing version control for your views. This ensures that you can track changes and roll back to previous versions if necessary.
Regular Maintenance and Cleanup
- Periodic Review: Schedule regular reviews of your System Views. Over time, business requirements may change, and some views may become obsolete.
- Removing Redundant Views: Identify and retire views that are no longer in use. Removing redundant views declutters the system and simplifies user navigation.
- Archiving Historical Views: If your organization needs to retain historical views, consider archiving them to keep the active views streamlined.
By adhering to these best practices, you'll not only create effective System Views but also maintain their relevance and performance over time. The result is a more efficient and organized Dynamics 365 environment that empowers your team to work with data seamlessly.
Testing Your System View
Creating a System View is just the beginning. To ensure it serves its intended purpose and functions flawlessly for users, thorough testing is essential. In this section, we'll explore the critical aspects of testing your System View within Microsoft Dynamics 365.
Ensuring Data Accuracy
- Data Validation: Start by validating the data displayed in your view. Confirm that it accurately represents the records meeting your filter criteria.
- Record Count: Check the record count to ensure it aligns with your expectations. If you expect to see a specific number of records, make sure the view displays them correctly.
User Acceptance Testing
- Involve End-Users: Engage end-users who will be using the System View in your testing process. Their feedback is invaluable in identifying any usability issues or discrepancies.
- Scenario Testing: Perform scenario-based testing. Create real-world scenarios and use cases to see how the System View handles different situations and user interactions.
- Responsiveness: Test the view's responsiveness across various devices and screen sizes. Ensure that it remains user-friendly on both desktop and mobile devices.
Performance Testing
- Load Testing: If your view deals with a substantial amount of data, consider load testing. Assess how the view performs under heavy data loads to identify potential bottlenecks.
- Response Time: Measure the view's response time. Users should not experience significant delays when interacting with the view or loading data.
Data Security Testing
- Role-Based Testing: Verify that security roles are correctly configured. Users with different roles should only have access to the views they are authorized to see.
- Record-Level Security: If applicable, test record-level security settings to confirm that users can only access data they are permi
Liked what you just read? Sharing is caring.

October 11, 2023 by Frédéric Charest by Frédéric Charest VP of Marketing
Data-driven Growth Marketer with a Passion for SEO - Driving Results through Analytics and Optimization

