
One of the most important features in Microsoft Dynamics 365 is the check box questionnaire. It allows you to get the best out of your CRM's fields, which is why knowing what a field is in Microsoft Dynamics 365 remains rather important.
There are various types of fields in Dynamics 365:
● Simple field: Type of field that contains variables that are not linked to a formula.
● Calculated field: Field containing calculations and can be automated.
● Rollup field: Field that contains a global value.
You can use these fields for a variety of purposes, including check box questionnaires. Such a form's design can seem difficult at first, but don’t worry - here's a step-by-step guide to creating a check box questionnaire in Dynamics 365.
Are you using your CRM correctly?
Discover if your company is using your CRM system to its full potential and strategies to move to the next level.

What is a check box questionnaire?
The check box questionnaire is a question form with Boolean fields as choices, accepting True and False values in this two-variable field.
If the value is True, this field produces a checked box; if the value is False - the box is unchecked.
A check box questionnaire can contain a variety of values:
1. Two Options. For example: Yes and No, or True and False.
2. Option Set. This type of questionnaire's boxes can hold a group of mutually exclusive variables. Only one option is available to the user.
3. MultiSelect Option Set. This box, like the standard option group, can contain a collection of options that are not mutually exclusive. As a result, the user has the ability of selecting several options.
What is the purpose of a check box questionnaire?
There are several benefits of using this kind of questionnaire. Because of their uniformity, the answers given by these boxes are usually clear and easier to analyze and interpret.
For example, this questionnaire can be useful when determining a preference or level of satisfaction with an employee's work.
How to make a new check box questionnaire field in Dynamics 365?
The method for generating a new field with a check box in Dynamics 365 is fairly straightforward.
1. In the Dynamics 365 settings menu, select theSolutions option, and then select the Solution in which you want to create the Field.
2. Choose the Entity to which you want to connect the field in the Solution, then go to the Fields section.

3. To add a new field to the Entity, select New.
4. Fill out the sections below:
a. Its display name
b. Its database name
c. Required field (whether it is mandatory or not)
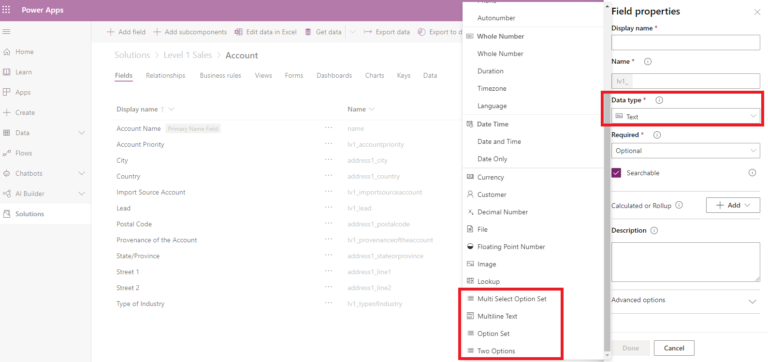
d. Its level of protection (right of access)
e. Audit
f. Its description
5. Choose a type of data for your new field: two options, group of options, group of multiple-selection options.
6. Select the type of field: simple, calculated, cumulative
7. Save your new field. Choose check boxes or radio buttons under the Format tab in the settings section.
Let's look at how a user can interact with a check box field now that we've seen how to make one.
Determine how a user can interact with the check box questionnaire field in Dynamics 365
You can customize the type of data in the check box field of your questionnaire after selecting the check box option. Here are the three available types:

1. Two Options: If you selected this data form, you will see two options in the values field, such as yes and no. You will be able to alter them by clicking the edit button.
2. Option Set: Adjust the format to a radio button field to ensure that only one choice of the proposed category can be selected.
3. MultiSelect Option Set: You can simply leave the format as a check box if you want to offer the option of selecting several boxes.
When you sign in, if your field is a check box rather than a radio button, you can change it to a flip switch in the form editor.
How to insert your check box questionnaire into a form?

After you've created your field, all you have to do now is incorporate it into your form. This can be done with either Power Apps or the classic editor. If you go for Power Apps, here's how you will proceed.
First, double-click the form into which it will be inserted and navigate to the Solution Explorer, then drag your check box to the desired location in the form.

You can also double-click on your field after clicking on the target section.

You can choose to add a flip switch to your field by clicking on it. All you have to do is select the option in the right column's component section.

What limitations does the check box questionnaire have in Dynamics 365?
The check box questionnaire feature in Dynamics 365 does have some limitations that can negatively impact the user experience.
You can't adjust the data type of field once you've selected and saved it, for example.
Another drawback is that when you create a field in Quick View, there is no Format option, though some users have discovered a way to get around this by manually adding it.
However, since Microsoft Dynamics 365 is a continually developing product, these weaknesses are expected to vanish as the developers correct them in future versions.
The check box questionnaire is a must-have in Dynamics 365
The check box questionnaire is a core element of Dynamics 365, letting you collect information that is consistent, precise, and easy to analyze. This feature offers a short and reliable answer for your customers and participants.
At the same time, this type of field is just one of the many options available in Dynamics 365. If you wish to know more, the Gestisoft team will gladly assist you in exploring all of Dynamics 365's functionality or obtaining support.
Our experts have a lot of experience with Dynamics 365 and know it thoroughly. Do not hesitate to get in touch with them!
Liked what you just read? Sharing is caring.

March 24, 2025 by Kooldeep Sahye by Kooldeep Sahye Marketing Specialist
Fuelled by a passion for everything that has to do with search engine optimization, keywords and optimization of content. And an avid copywriter who thrives on storytelling and impactful content.

