
Dynamics 365 Field Service is a business application that provides your mobile workers with the essential tools to fix customer issues directly onsite. Its schedule board settings, organizational algorithms and workflow automation help businesses optimize workers’ productivity when delivering service at customer locations.
Whether you offer equipment repairs, manufacturing and machine maintenance, utility support or other technological services, the Field Service business application is an amazing opportunity to accelerate your growth and digital transformation.
Field Service allows you to:
- Enhance the scheduling process
- Optimize your organization
- Increase your technician’s weekly service calls
- Improve time management and customer communication
- Reduce travel time, equipment downtime and resource wear
When it comes to organizing your resources and optimizing their time, the schedule board settings in Dynamics 365 Field Service is an essential tool for your success. Read on to find out more on what it is and how to set it up.
What is a schedule board setting in Dynamics 365 Field Service?
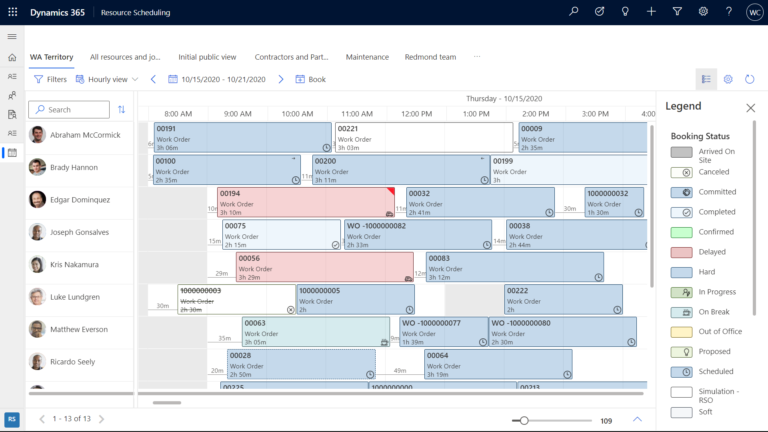
The Dynamics 365 Field Service schedule board setting is a functionality that allows you to manage your schedule, workers and bookings. It’s a core feature in Dynamics 365, offering a comprehensive overview of all your resources and requirements.
The schedule board can be accessed from the main menu, by clicking on the Scheduling tab. There, you can monitor the availability of your resources and assign them to tasks and time slots.
At first glance, the schedule board presents:
- A list of your workers and their availability;
- An hourly (and daily) timeline overview of your bookings;
- A list of all open requirements and work orders.
Hovering over the different elements with your mouse will provide you with more information, such as further details about the bookings or contact cards for your resources. The bookings shown on the timetable are also color coded in relation to their entity, to define, for example, whether it is a work order, case or opportunity.
Beyond the basic features, you can also customize this workspace according to your needs. For example, along with tasks for your resources, it’s equally possible to enable appointments as part of Resource Scheduling for Entities.
Further in this article, you will learn how to enable a map that displays the location of your resources, bookings, requirements and organizational units. Keep reading to find out how to configure the schedule board to make it do exactly what you want.
For whom is Dynamics 365 Field Service schedule board useful?
So whom does this feature benefit?
- The management team and the dispatchers;
- The company resources;
- Your business as a whole.
All in all, the Dynamics 365 Field Service schedule board is an invaluable tool for any company that employs a field service team for its operations. If you or your employees have to make scheduling decisions, assign work orders to technicians, or reserve equipment for customer projects, you will find the schedule board setting in Dynamics 365 Field Service to be a powerful ally. Once you implement it into your operations, you will have an irreplaceable asset for your service managers and dispatchers.
Furthermore, it will also prove to benefit your resources. By helping your workers to be organized, the schedule board will increase their productivity and optimize their time. As such, it would eliminate ambiguity in tasks and expectations, thus alleviating unnecessary stress from your team.
When your operation is well-organized, all the tasks are clear and defined, and there is an efficient managerial structure in place, everyone wins. The schedule board setting in Dynamics 365 Field Service thus benefits every level of your business, from making the management’s job simpler to providing the workers with clear and defined tasks.
Let us help you with the schedule board settings of Dynamics 365 Field Service.
Contact us today and let's plan a free consultation based on your business needs.
 Contact Sales
Turn on maps for a full use of schedule board settings in Dynamics 365 Field Service (Pre-2021)
While the basic view of the schedule board offers resources, bookings and work orders, there are other useful features that you can turn on. One of those features is the Dynamics 365 Field Service Schedule Board Map View, which will appear in the Filter & Map View tab on the left side of the screen. The map view is connected to Bing Maps and displays the location of your bookings, requirements, resources and organizational units, as well as toggleable filters and a color legend.
If you try to click on the map view before configuring maps, you will receive a message stating “We can’t connect to Bing Maps because they are disabled. Please navigate to ‘Resource Scheduling / Administration / Scheduling Parameters / Connect to Maps’ to enable connection”. You must thus enable maps. To do so:
- Navigate to the Ressources menu;
- Scroll to Administration under Ressources;
- Select Scheduling Parameters;
- Find Connect to Maps and set it to Yes.
Once complete, your map will be enabled, and you can display it by clicking on Map View under the Filter & Map View tab.

Please note that this feature will be released for the new Dynamics 365 schedule board in the first wave of updates in 2021. If you need to use this feature beforehand, simply deselect the New Schedule Board prompt situated in the top right corner of your screen.
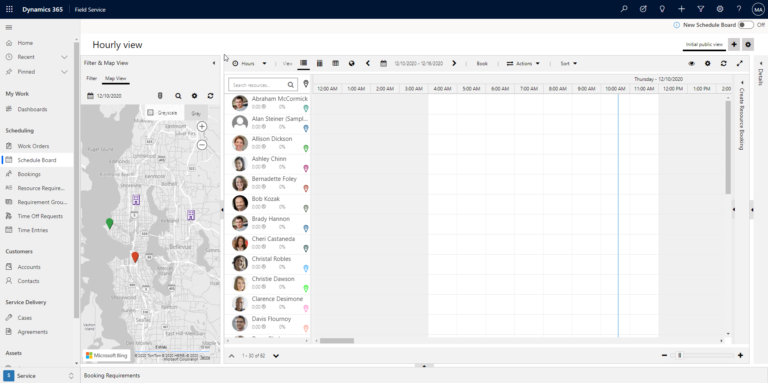
How to configure schedule board in Dynamics 365 Field Service?
As mentioned before, the Dynamics 365 Field Service schedule board can be customized to respond to your specific needs. In the chapter above, we have enabled the map. Now, we will look at how to configure the schedule board’s other elements such as filters, tabs, alerts and more.
Filter and map view
This feature allows you to track the location of all your operations, separately or one by one. Here you will find an integrated map with traffic, filters and color legend. You can configure the filters in the schedule board by clicking on the Filter tab. There, you can filter information by Characteristics – Rating, Roles, Territories, Organizational Units, Resource Types, Teams, and Business Units.
Filters and default filters
You will find the list of all the filters and their descriptions below. You can also configure default filters for quick use by clicking Options and selecting Save Current Filters as Default. Select Load Default Filters if you wish to revert to your default settings.
Characteristics – Rating - measures the level of a resource’s skills from familiar to good to proficient.
Roles - defines the skills associated with a particular resource role.
Service Territory - displays only the local resources in a particular territory.
Organizational Units - filters billable resources with distinct cost rates from other groups and divisions in the company.
Resource Types -separates resources by user-defined categories based on their occupation.
Teams - defines the resources by their respective teams.
Business Units - displays groups with access to specific information.
Specific set of resources
It is possible to display only one specific set of resources on the schedule board, which can prove useful for viewing select territories or resource types. In order to set a specific set of resources:
- Under the Filter & Map View Tab, Open the Filter subtab
- Click Options > Select Resources;
- Apply the Resource Type and/or Service Territory filter in the Resources dialog box;
- Once only the desired resources appear under All Resources, click Move all to right;
- Click Apply.
Tabs, additional tabs and details
Configuration tabs serve as a sort of command centre for a variety of actions such as time units and offset, view orientation, booking alerts, driving directions, schedule printing and moving bookings to the next day. You can configure the displayed time by clicking Hours and selecting whether you want to see hours, days, weeks, months or years. If you wish to switch from horizontal view to vertical view, click Vertical View.
Scheduler settings
In scheduler settings, you can link dates and content with a location and configure your time offset. The Scheduler Setting button displays the following list of parameters:
- Time zone;
- Working Time – The beginning and the end of a workday;
- Time Resolution – More precise scheduling of resource time;
- Resources per page – How many resources to show in the schedule board;
- Number of Days – How many days to show in the schedule board;
- Sizes – The size of rows and columns on the schedule board;
- Travel Duration Settings – Displays the travel time on the schedule board if you activate Show Travel Time;
- View Settings – Hide/show the map legend, as well as canceled and deactivated bookings;
- Booking Requirements Settings – Territory-specific booking requirements.
Do you have questions about your field service operations?
Find out how advanced your field services are and strategies for taking them to the next level.

Booking requirements and booking alerts
At the bottom of the schedule board, you will find all of your unscheduled bookings, which you can then drag-and-drop into your schedule. There, you can also assign resources to unscheduled bookings according to booking requirements. You can navigate the booking requirements by:
- Clicking column headings to sort the data;
- Dragging column boundaries to adjust width;
- Moving between pages with arrows.
While the Dynamics 365 Field Service schedule board offers great flexibility for custom configuration, it isn’t without its challenges for beginners. Of course, Microsoft provides a wealth of information in its documentation. However, if you would like to get the best out of this powerful tool, it may be helpful to consult with an expert from Gestisoft.
Liked what you just read? Sharing is caring.

January 21, 2025 by Kooldeep Sahye by Kooldeep Sahye Marketing Specialist
Fuelled by a passion for everything that has to do with search engine optimization, keywords and optimization of content. And an avid copywriter who thrives on storytelling and impactful content.

