
Do you have a CRM or ERP and wish that some sections of your software were only accessible to certain people in your organization? Dynamics 365 lets you identify who can see what.
Basically, by integrating security roles, you’ll identify who can see what. This often motives our clients to review their business’ organizational chart to determine a hierarchy for access to information. In this blog, we explain security roles, why you should assign them and how to create and assign them.
What are security roles in Dynamics 365?
According to Microsoft’s definition, a security role “defines how different users, such as salespeople, access different types of records. To control access to data, you can modify existing security roles, create new security roles, or change which security roles are assigned to each user. Each user can have multiple security roles.”
Microsoft Dynamics 365 defines privileges as types of tasks that users can do within a record or form. There are different types of privileges. Task-based privileges give users privileges to perform specific tasks, like publishing articles or performing a mail merge operation.
A security role determines the privileges that these users can have within a CRM. In the section How to create security roles, we will explain in practical terms how to create these security roles; this will tangibly demonstrate all the theory that you just read about. As Mao Zedong said, “theory is based on practice.”
Why create security roles in Dynamics 365?
I have a question for you: would you like to work in this space?

We can compare your software to your work desk.
Your role as a business is to make your space as attractive as possible so it is easy and enjoyable to work in. If you do not create security roles, your CRM and/or ERP software for your employees could give the same impression as the image above. Security roles ensure that your users see what they use in their daily work.
It’s therefore important to have an up-to-date organizational chart for your business. Security roles specify the records that each group can see. For example, the records used by your accounting team will definitely not be the same ones used by your customer service department. Give your users the joy of working in a refined environment where they will not have to look so hard to find information in your Dynamics 365 CRM. Let them use this tool as their work environment instead!
.jpg)
How to create security roles in Dynamics 365
So you’ve got your business’ hierarchal organizational chart in hand and you’re all set to create security roles for users of your Dynamics 365. Before starting this process, check if there are any existing security roles that may adequately fulfill your needs. Creating a security role from scratch can be quite a lengthy process for you or your business partner. You will soon understand why.
To create security roles, you will first need to ensure that you are an administrator in your Dynamics 365. If you attempt the steps described in this blog and realize that you do not see the icons that I show you in these instructions, then you do not have the security level needed to perform this task. So, without further delay, let’s get right into this topic and learn how to navigate within Dynamics 365 to create these security roles.
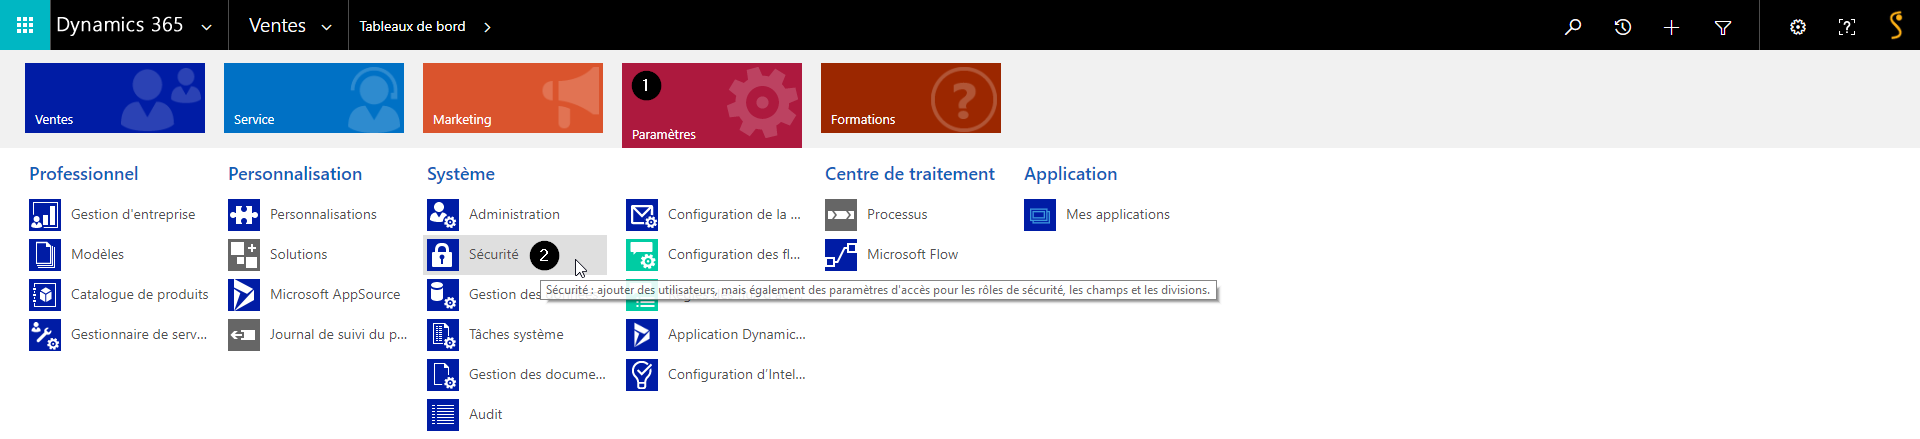
Step 1

First, click Settings and select Security.
Step 2
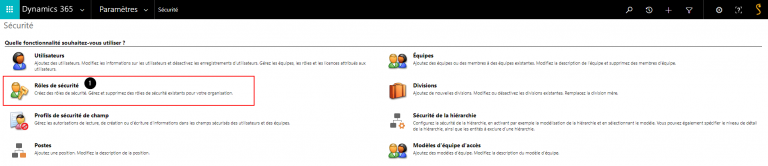
Select the Security roles icon.
Step 3
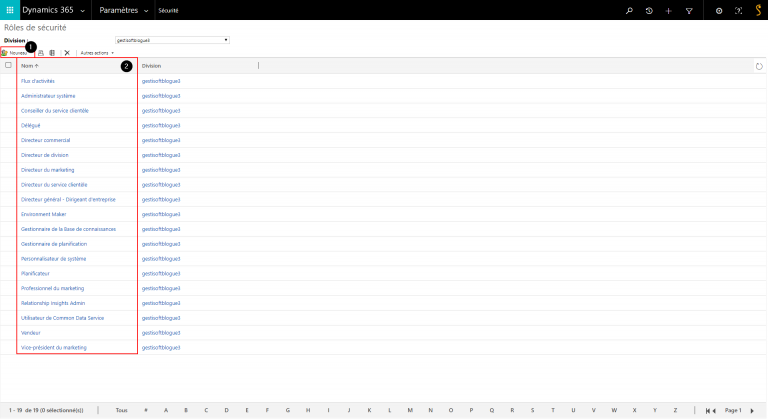
What you see above is the list of the different system security roles (point #2). You can create a new security role (point #1) or view the configurations of one of the system security roles by double‑clicking the name. For the next step, we clicked the New button (point #1).
Step 4
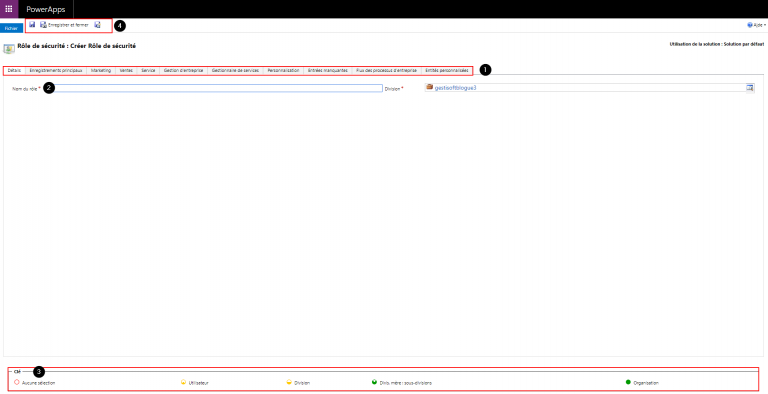
This screen shows the security role editor.
- Point #1 shows the security roles for different modules: Details, core records, marketing, sales, service, etc.
- Point #2 is the name given to the security role created.
- Point #3 shows the coloured circles on the security role settings page that define the access level for that privilege. Access levels determine how deep or high in the organizational business unit hierarchy the user can perform the specified privilege. The following table lists the levels of access in Microsoft Dynamics 365, starting with the level that gives users the most access.
Global. This access level gives a user access to all records in the organization, regardless of the business unit hierarchical level that the instance or the user belongs to. Users who have Global access automatically have Deep, Local, and Basic access, also.
Because this access level gives access to information throughout the organization, it should be restricted to match the organization’s data security plan. This level of access is usually reserved for managers with authority over the organization.
The application refers to this access level as Organization.
Deep. This access level gives a user access to records in the user’s business unit and all business units subordinate to the user’s business unit.
Users who have Deep access automatically have Local and Basic access, also.
Because this access level gives access to information throughout the business unit and subordinate business units, it should be restricted to match the organization’s data security plan. This level of access is usually reserved for managers with authority over the business units.
The application refers to this access level as Parent: Child Business Units.
Local. This access level gives a user access to records in the user’s business unit.
Users who have Local access automatically have Basic access, also.
Because this access level gives access to information throughout the business unit, it should be restricted to match the organization’s data security plan. This level of access is usually reserved for managers with authority over the business unit.
The application refers to this access level as Business Unit.
Basic.
This access level gives a user access to records that the user owns, objects that are shared with the user, and objects that are shared with a team that the user is a member of.
This is the typical level of access for sales and service representatives.
The application refers to this access level as User.
None. No access is allowed.
(Source: https://docs.microsoft.com/en-us/power-platform/admin/security-roles-privileges#security-roles)
- Point #4 lets you save your security role, save and close your security role, or save and create.
Step 5
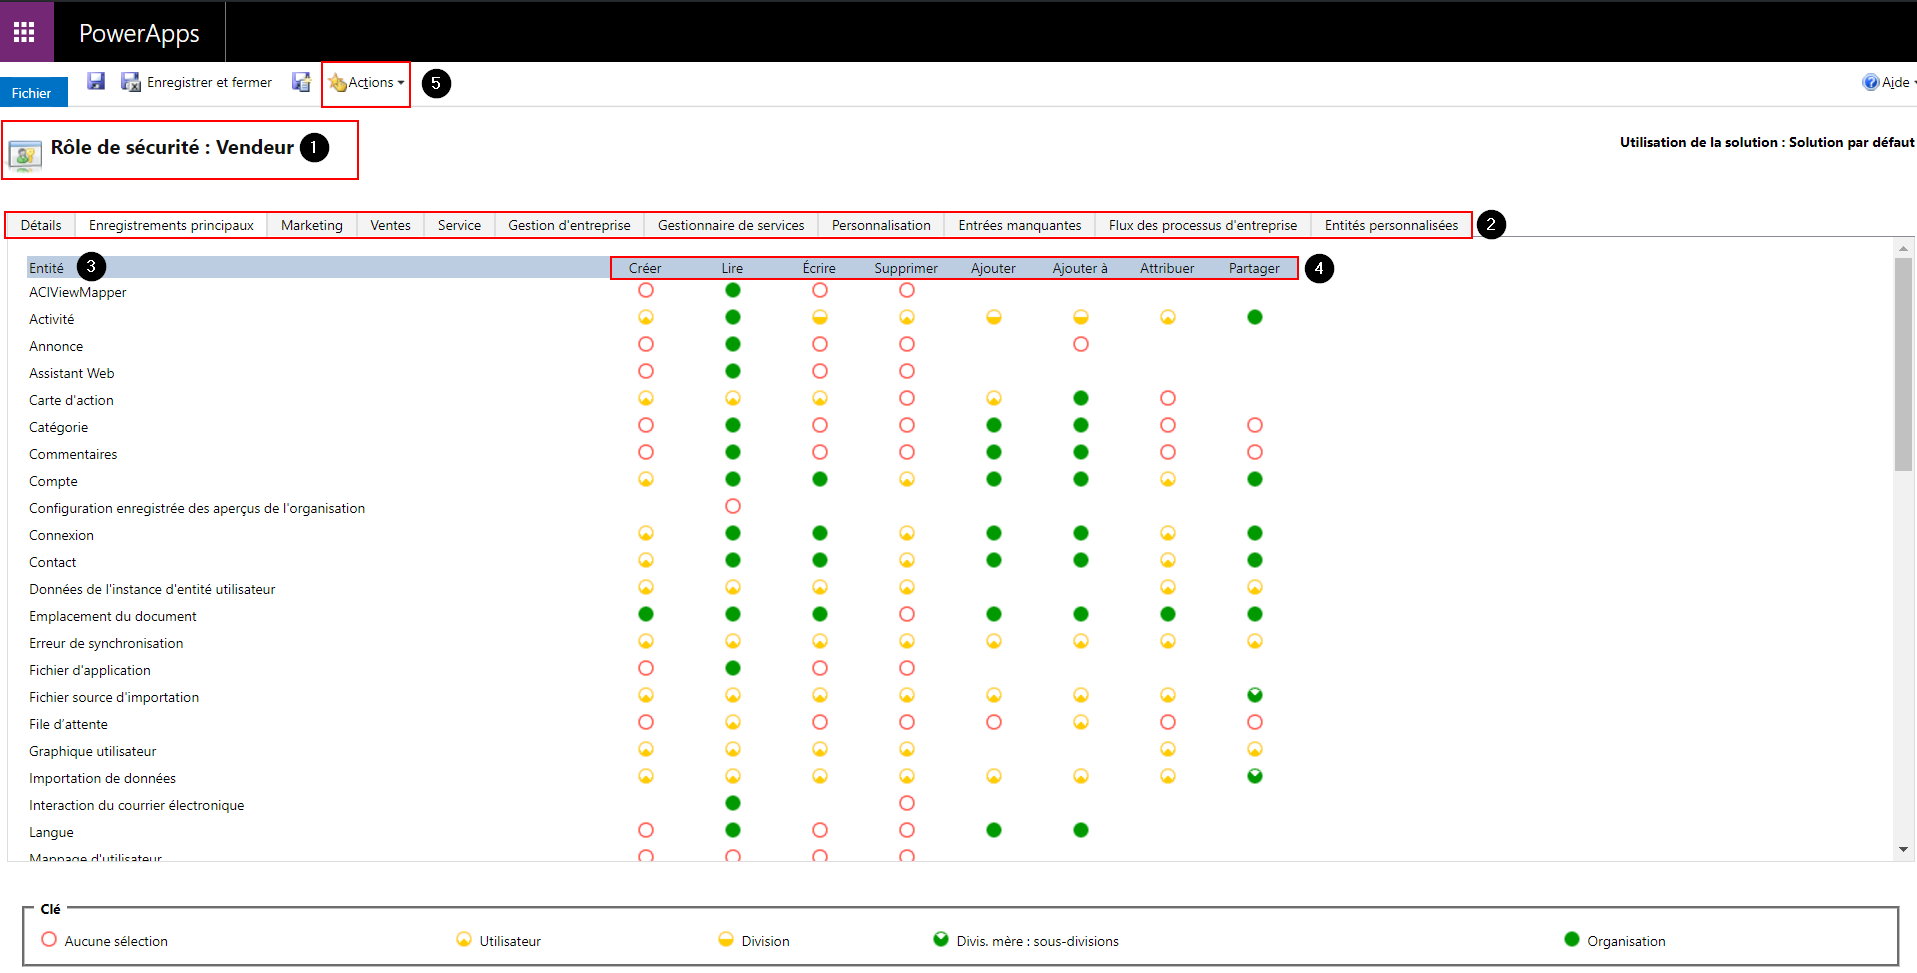
To help you fully understand what we explained above, we have opened the Salesperson security role.
- Point #1 is the name of the security role.
- Point #2 shows the security roles for different modules: Details, core records, marketing, sales, service, etc.
- Point #3 shows the entities being modified according to the privileges assigned to users with the Salesperson security role.
- Point #4 shows the different privileges that you can assign for each entity of the Salesperson security role.
- Point #5 shows the Actions button that lets you email a link, delete the security role or copy the role.
As you can see, creating a security role from scratch can be quite a lengthy, complex process. Therefore, we suggest that you always look at the system security roles and start with this template, customizing it as needed. To create a role from an existing template, simply click the Actions button and select Copy Role. This will open the following dialog box.

How to assign security roles with Microsoft Dynamics 365
Once you have created your security role, you need to assign it to the users of your Dynamics 365.
Step 1
First, click Settings and then select Security.
Step 2
.png)
Click the Users option.
Step 3

The image above shows the list of your Dynamics 365 users. Select the user whose security role you want to change.
Step 4
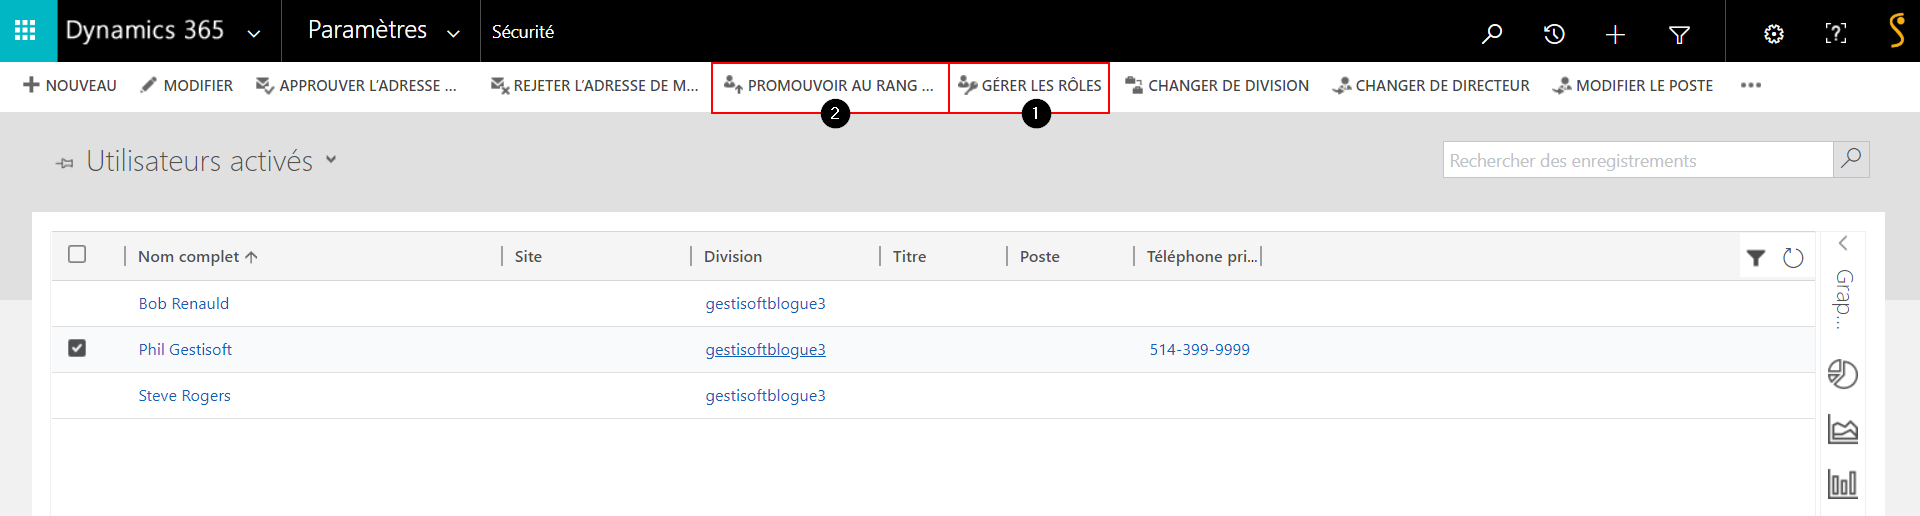
In this case, we selected Phil Gestisoft. You have 2 options for assigning a role:
- Point #1 lets you select which role you want to assign to the user Phil Gestisoft (see Step 5).
- Point #2 lets you promote Phil Gestisoft to an admin role. The administrator of your CRM is the only one who can promote a user to this role.
Step 5
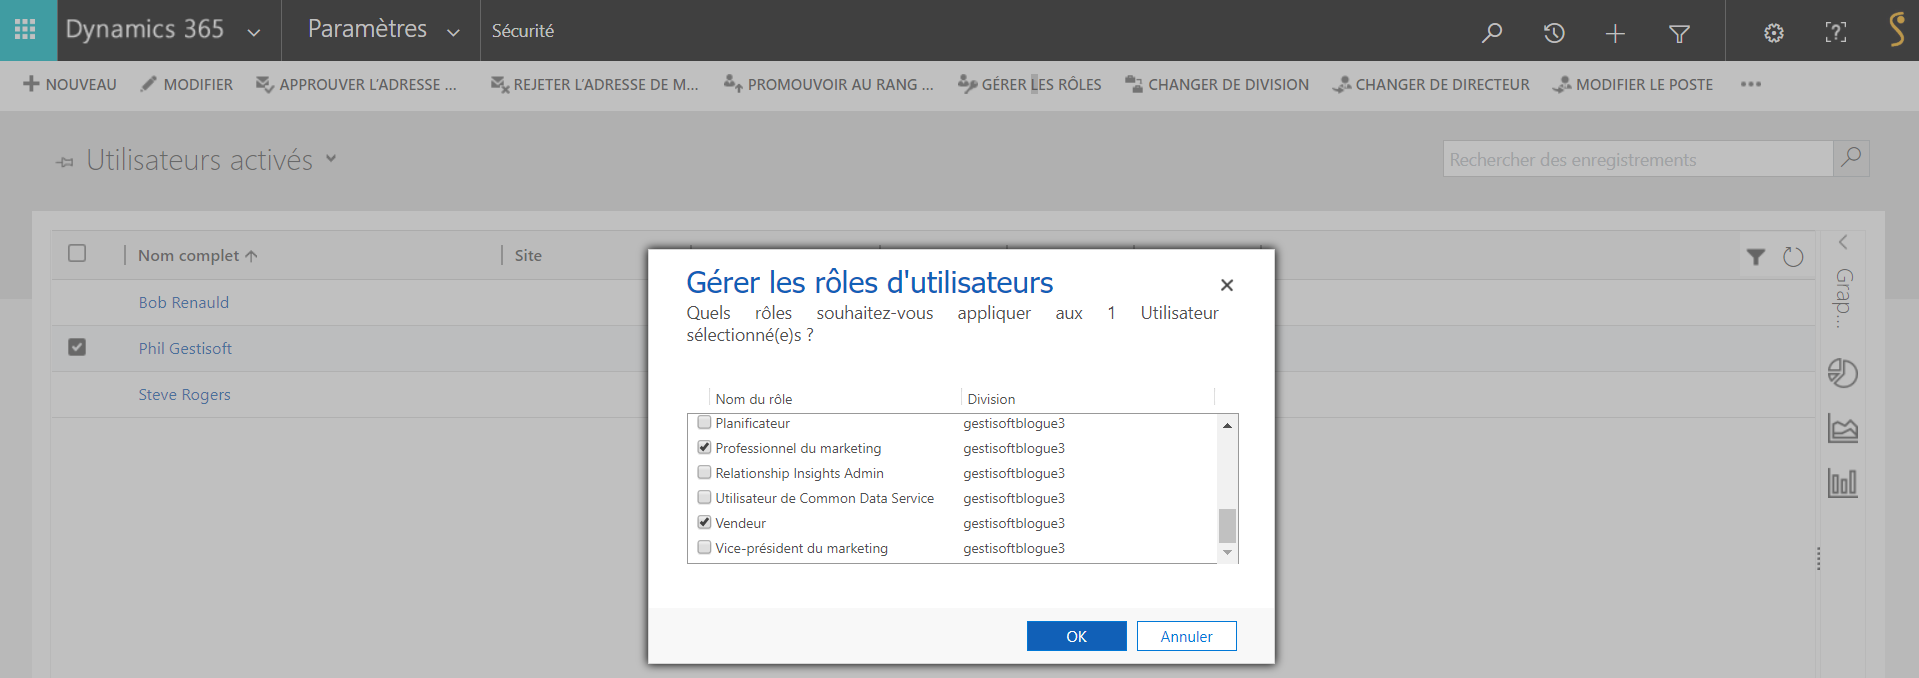
Once you have selected the user Phil Gestisoft and clicked Manage roles, the dialog box shown above will appear. Select the role or roles you want to apply to this user and click OK.
You can give a user more than one role. It’s important to note that if 2 roles have different access levels, the privileges of the security roles are cumulative—when a user has multiple security roles, they have all the privileges associated with either of them. Privileges are added on to one another and do not cancel each other out. Make sure you always keep this in mind when a user has multiple security roles.
Conclusion
In conclusion, security roles serve an important purpose in your CRM and/or ERP. They let you control which information is internally accessible, and, above all, allow you to filter out elements of your software program based on individual roles. A software program that is filled with excess superfluous information can make it less efficient and decrease the likelihood that your employees will use it. To maximize its efficiency and acceptance rate, you should design the architecture of your business’ CRM carefully.
Want to learn more about security roles in Dynamics 365? No matter your type of business, corporation or organization, contact Gestisoft today via the contact page on our website. Our team will respond to all your questions or requests very shortly!

Liked what you just read? Sharing is caring.

May 09, 2025 by Kooldeep Sahye by Kooldeep Sahye Marketing Specialist
Fuelled by a passion for everything that has to do with search engine optimization, keywords and optimization of content. And an avid copywriter who thrives on storytelling and impactful content.

